View on Github ︎
ChordSet Overview Demonstration
Introduction
Since the adoption of the graphical user interface - icons and toolbars have become an increasingly important part of applications. As apps grow in complexity icons, are able to provide concise and convenient ways to complete an intended action. On the other hand, scrolling through a large menu, or finding the correct icon graphic on the toolbar, can take a lot of time. Because of this keyboard shortcuts have been implemented into modern day applications to increase the effectiveness of a program, however no matter the significant time gains one can uncover by using keyboard shortcuts, both users and experts still prefer interacting through icons, or directly through the GUI.

The above two graphics, are from the “Hidden Costs of Graphical User Interfaces” research paper from Rice University, and they describe that despite the fact a user can save over 2 seconds while using a keyboard shortcuts (left graphic), they without a doubt favored interacting directly with the user interface (right).
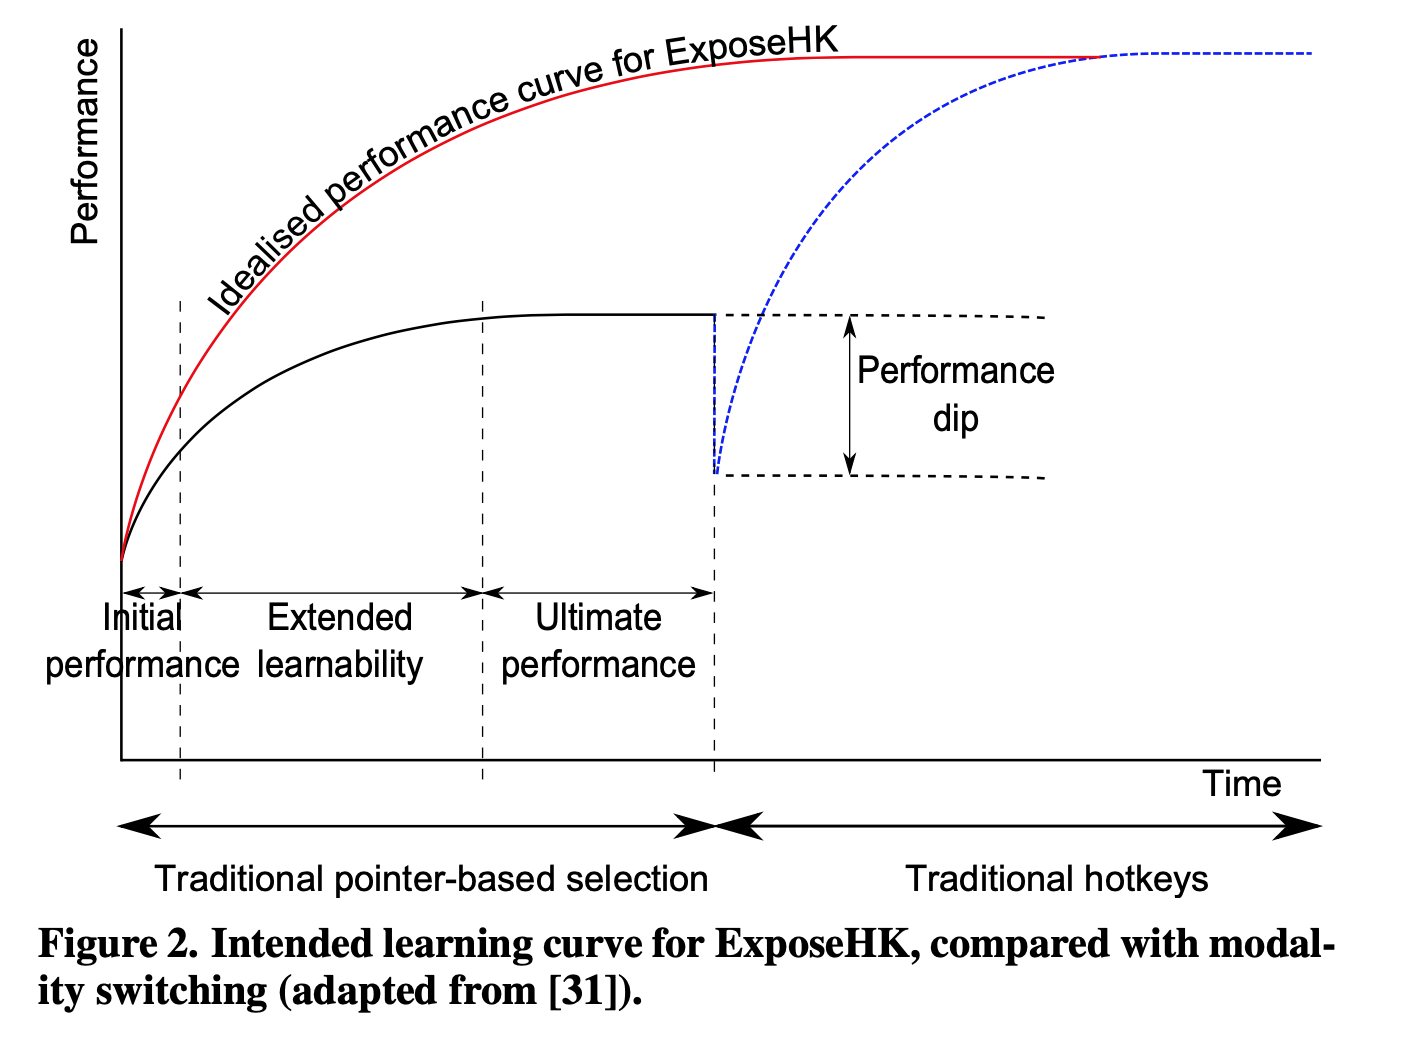
Research from ExposeHK, conducted by the University of Canterbury, Christchurch, New-Zealand, cites John M. Carroll’s ‘paradox of the active user’ which suggests that users are too engaged in their tasks to consider learning keyboard shortcuts. And as displayed in the graphic above, the longer it takes to learn a shortcut, the longer the performance dip.
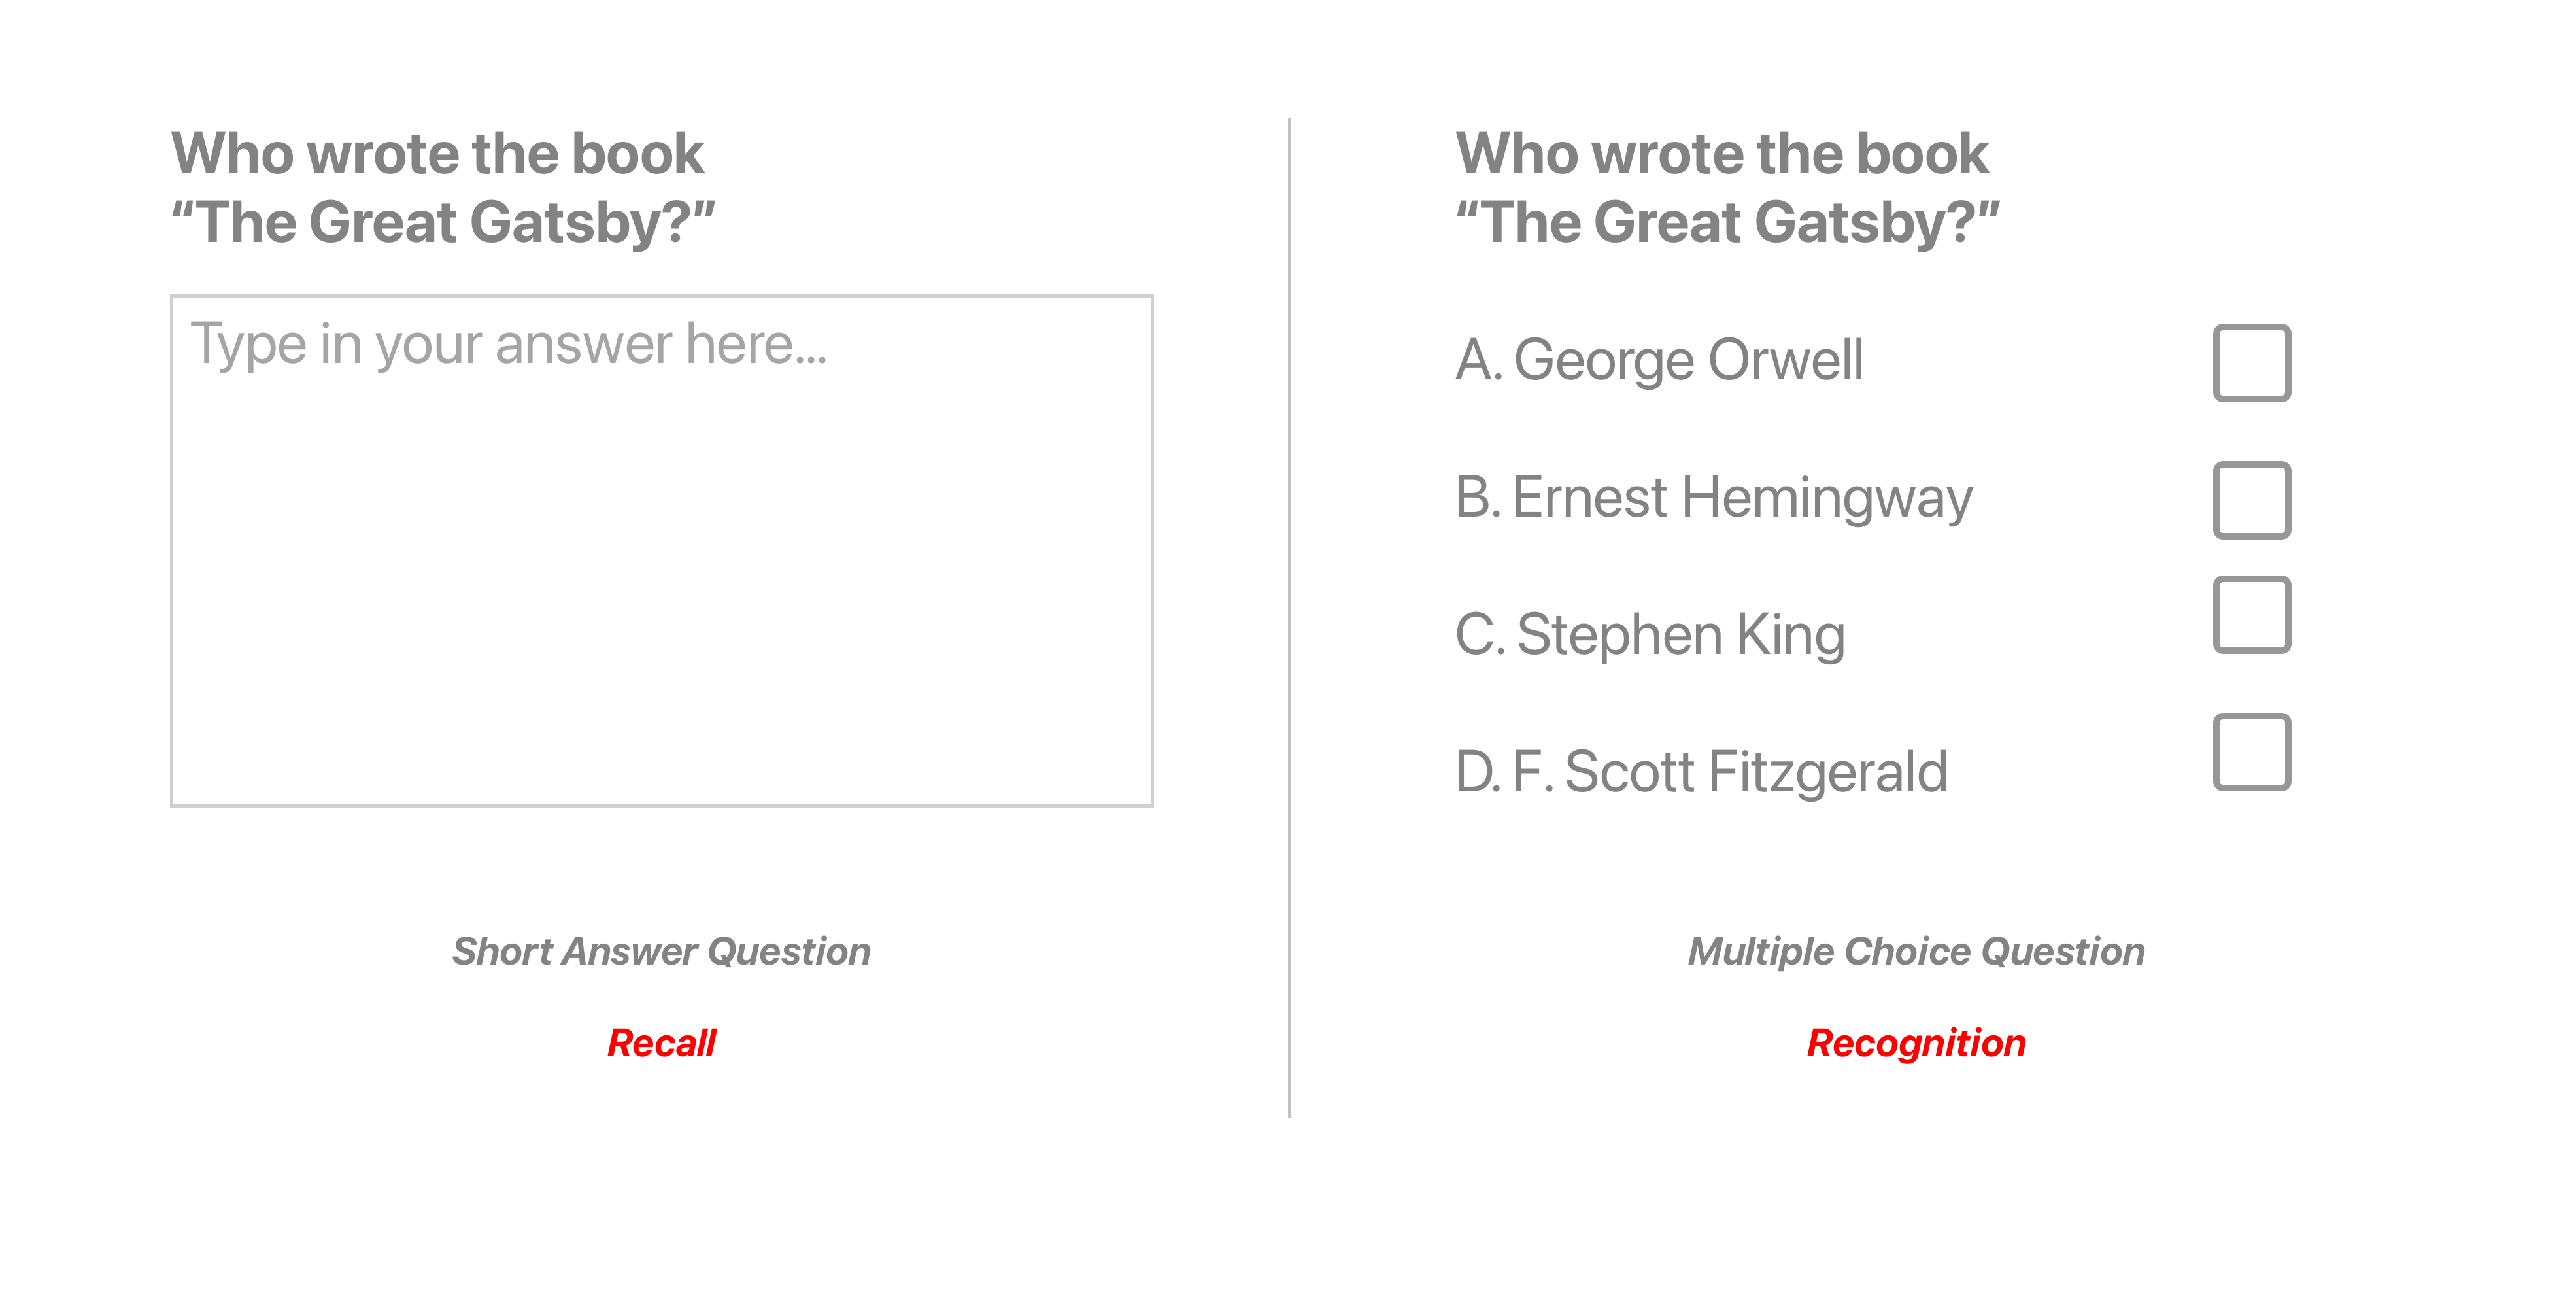
Lastly, through a great article by Ty Walls, on TygerTec, entitled “Keyboard shortcuts! Quickly learn 'em — and never forget,” I learned that keyboard shortcuts rely on memory recall, instead of recognition, taking a lot of brain power in order to execute a keyboard command. If you look at the above graphic, you can see that coming up with the answer, of “Who Wrote The Great Gatsby,” is a lot easier if you have contextual hints to refresh your memory.
One may say, “But there is a system…”
Yes, although you can access shortcuts by navigating the list on the GUI or reading application manuals, there are 3 issues with this.
1. You have to take your off of the keyboard in order to find the shortcut.
2. Modifier key symbols (⌘,⌥, ⌃,⇧) are difficult to understand.
3. (Leading from 2) it is difficult to spatially map the complex symbols to their position on the keyboard
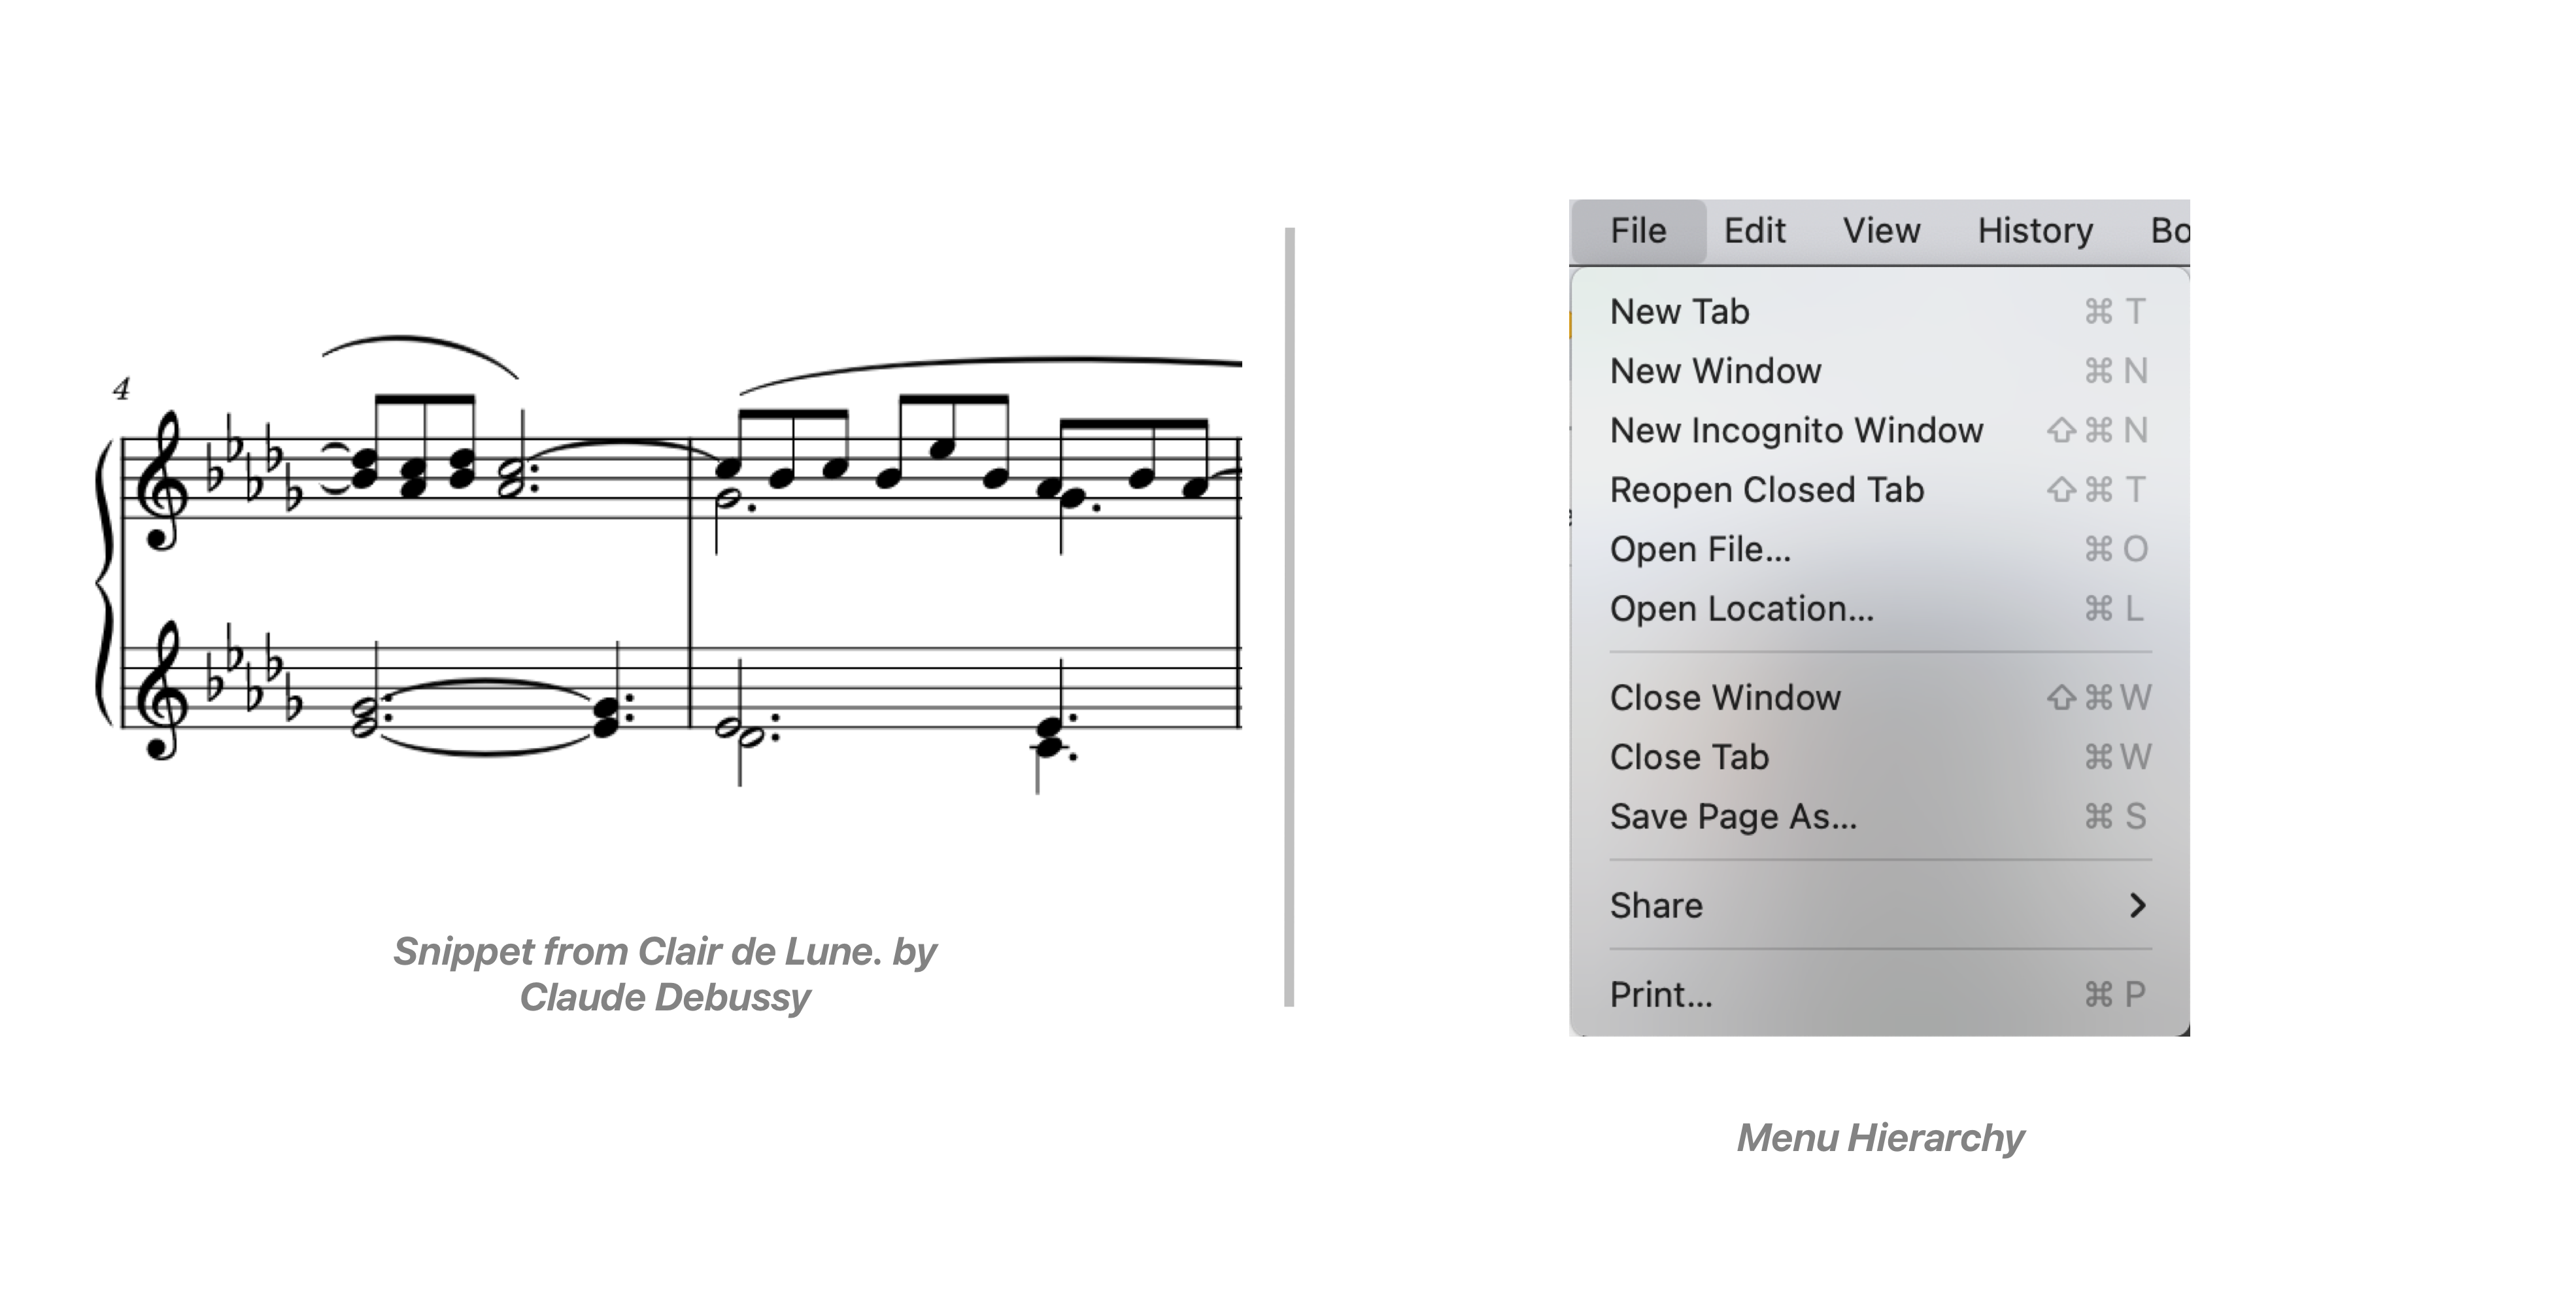
So what’s the difference between reading a piece of sheet music and learning a keyboard shortcut? Both provide users with instructions from an interface to mapping a piece of information the keyboard.
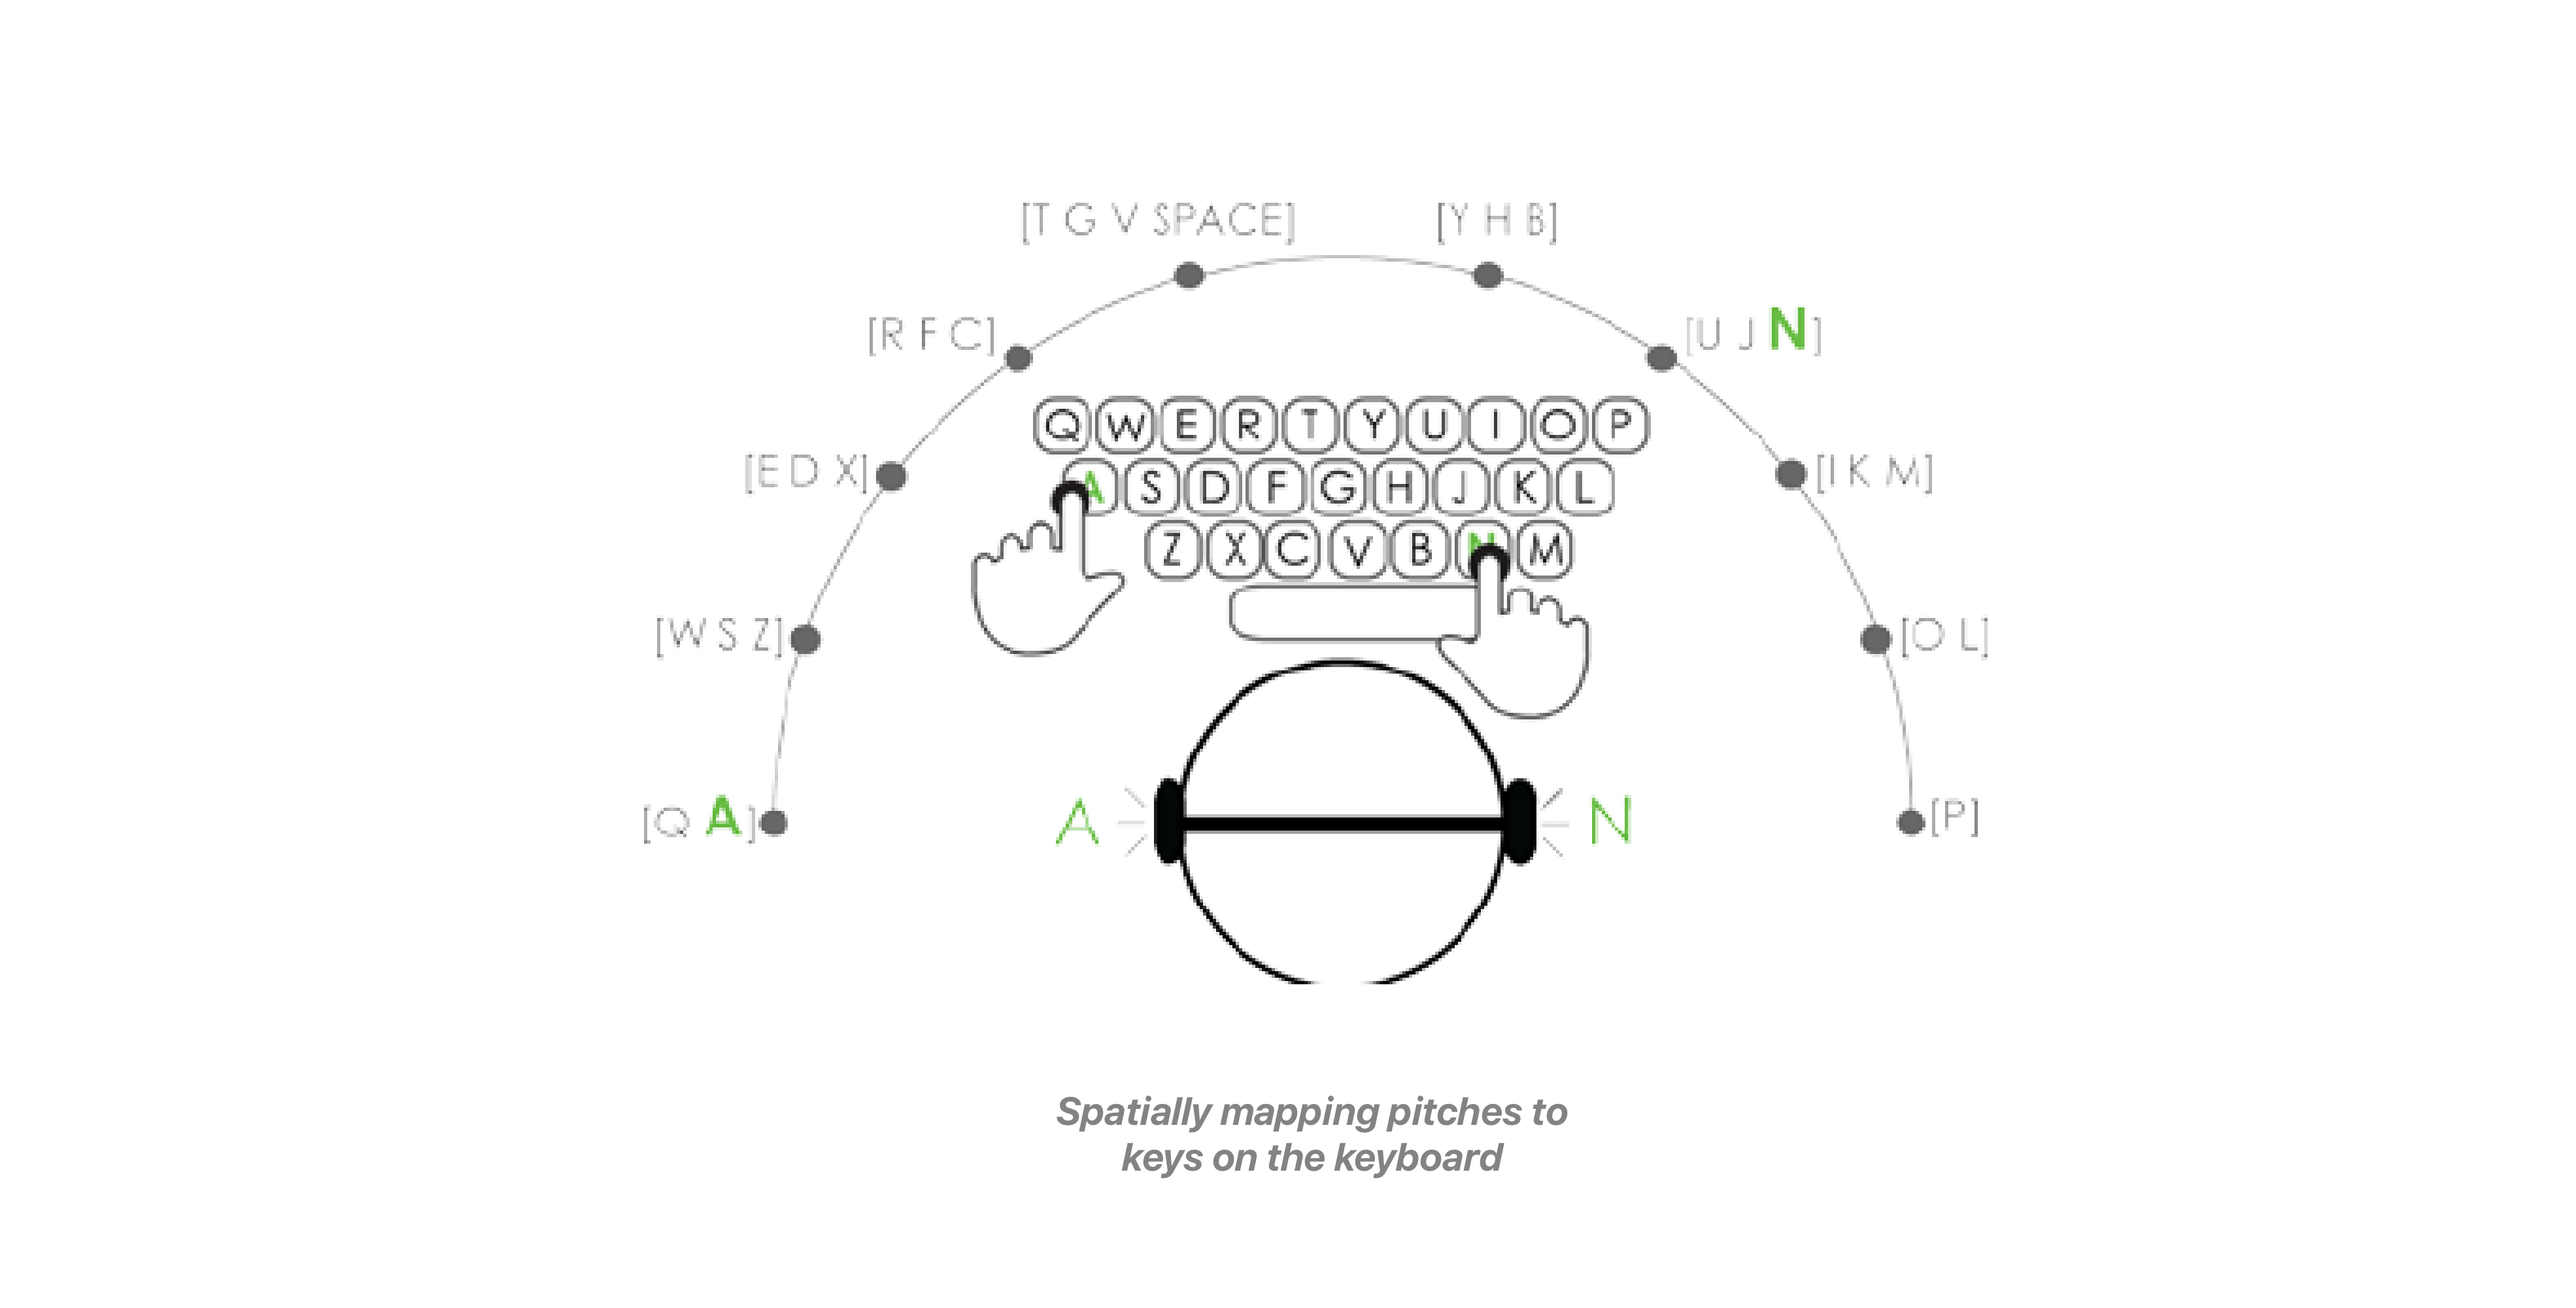
With sheet music the notes provide reference to different keys on an instrument which are understood by various pitches. This is a lanauge that is consistent across instruments, and enables the user to make sense of the system. On the other hand, keyboard shortcuts, lack uniforminity between apps, and their is no clear reason as to why certain shortcuts are mapped to particular keys.
Thus, after gathering and understanding research on this idea, I learned that the primary reason that keyboard shortcuts are underutilized, is because they lack contextual relevance.
Looking at Current Solutions
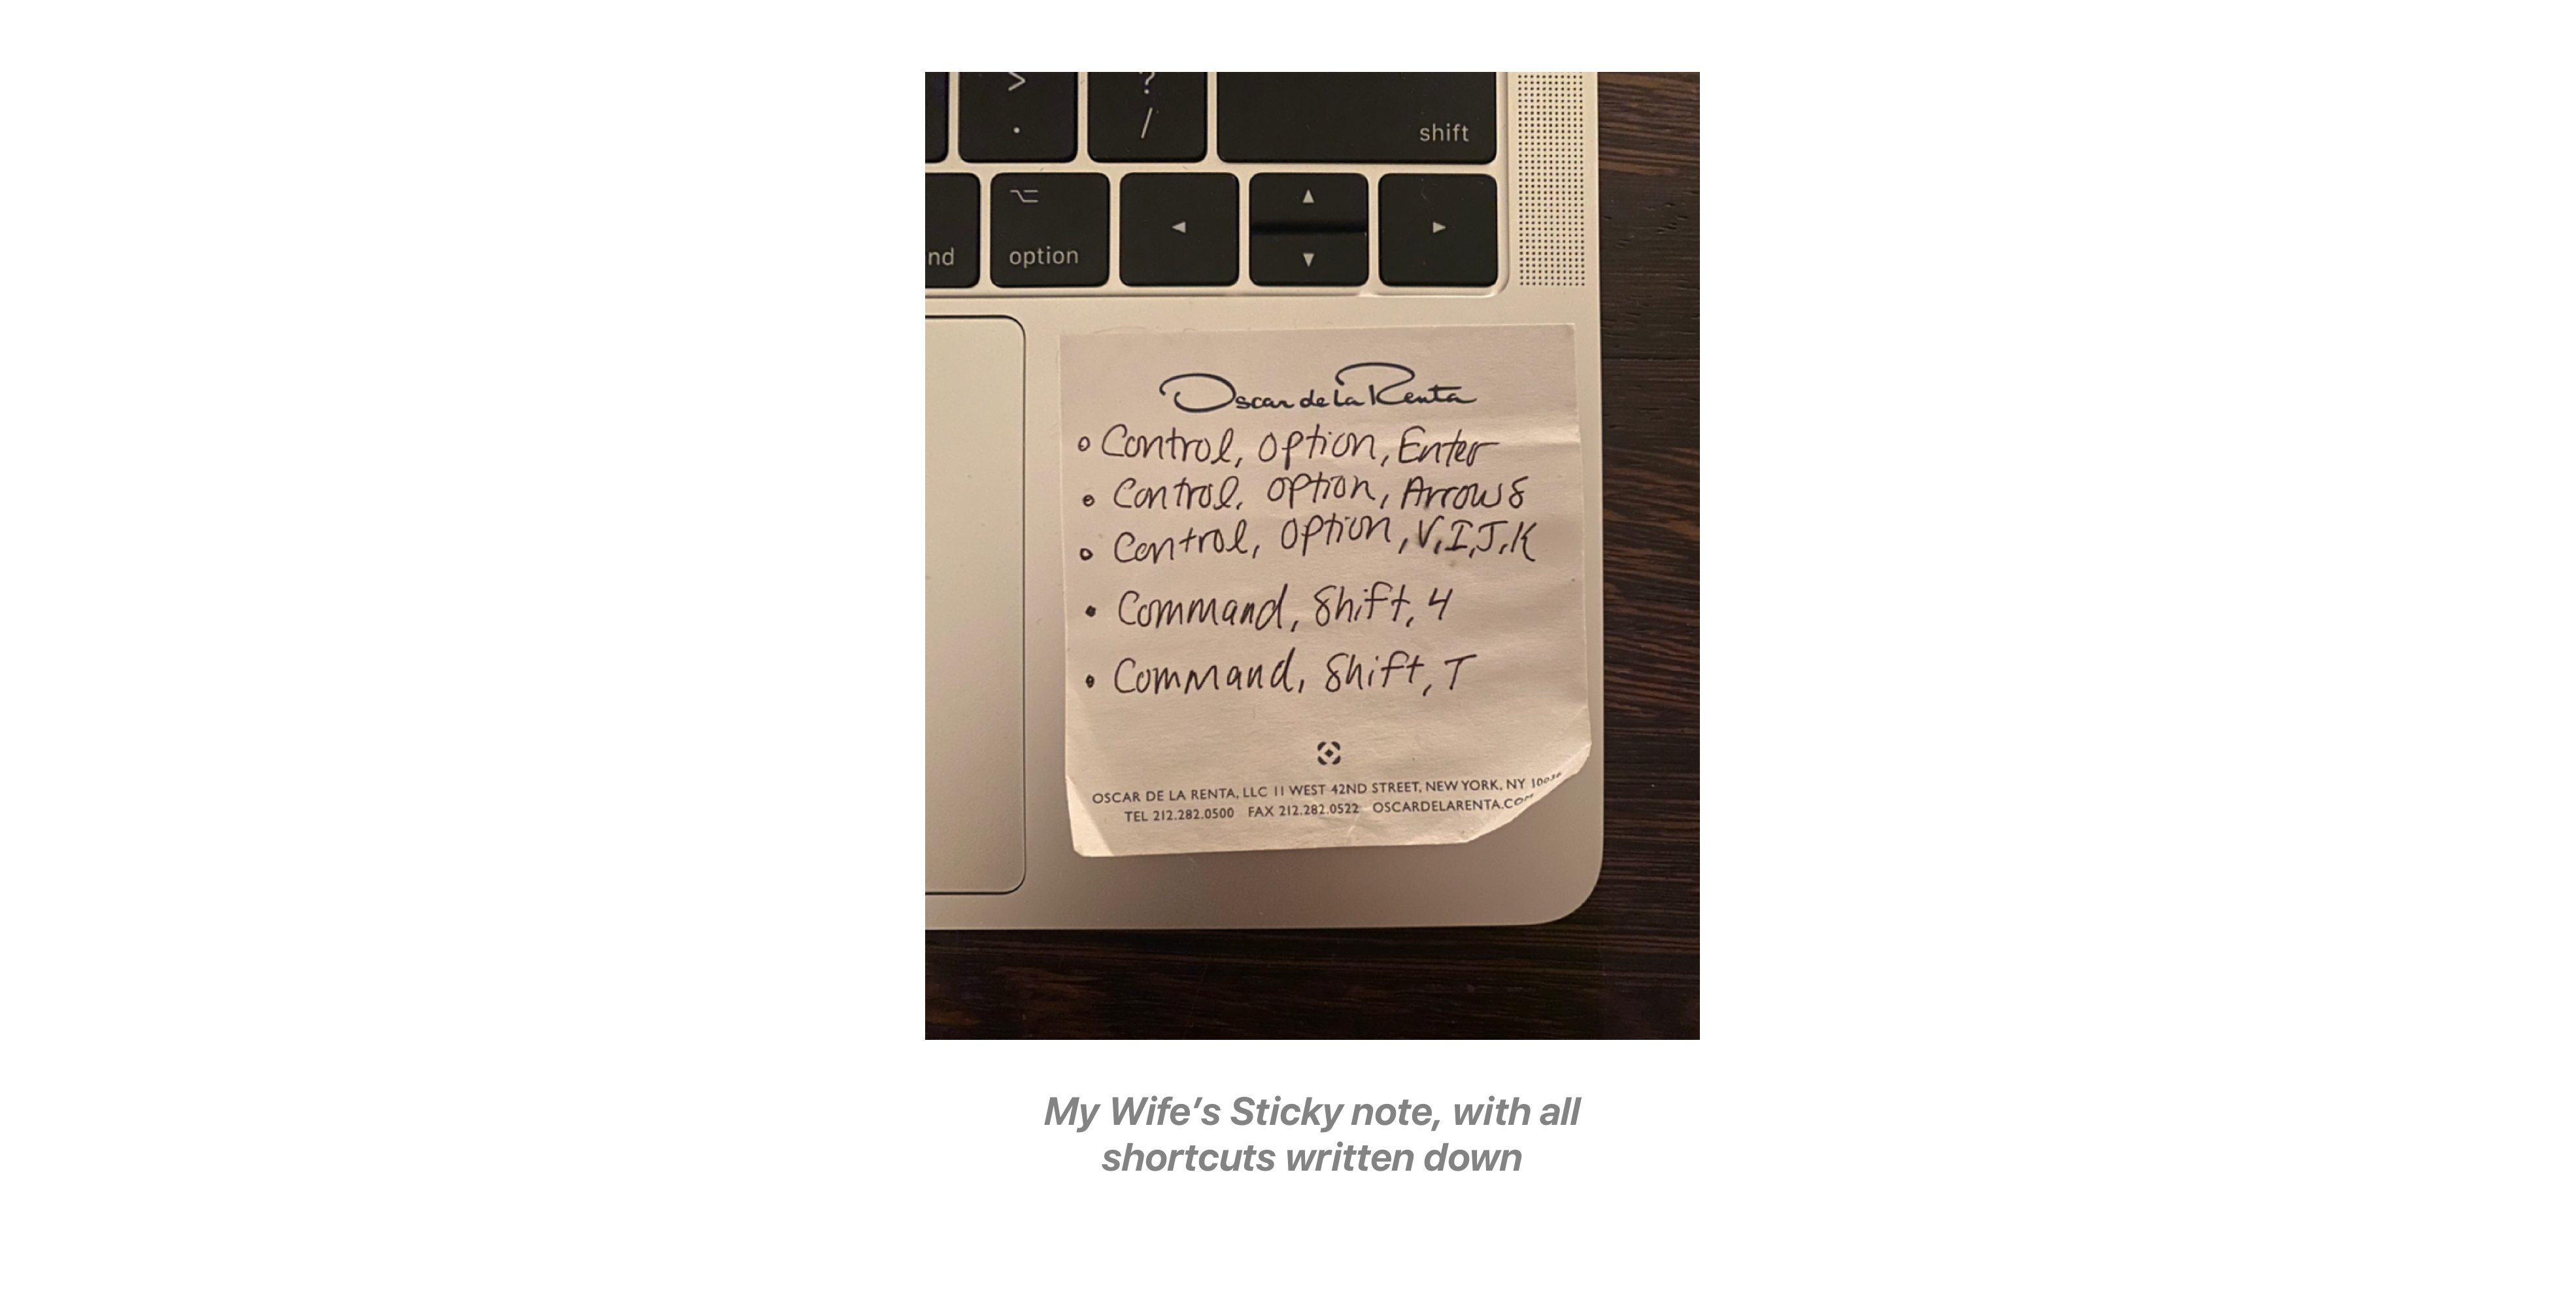
When designing, my goal was to develop a system that could leverage Augmented Reality in order to display shortcuts directly on a keyboard. I also had a specific use case in my mind.
Hold on…my wife is calling me. “Andy how do you do the screenshot shortcut again?” As you can see here, shortcuts are both difficult to memorize, and the complex symbols make it even harder to spatially map on the keyboard.
–
“So, Andy, tell me what are some currently available solutions to your problem?”
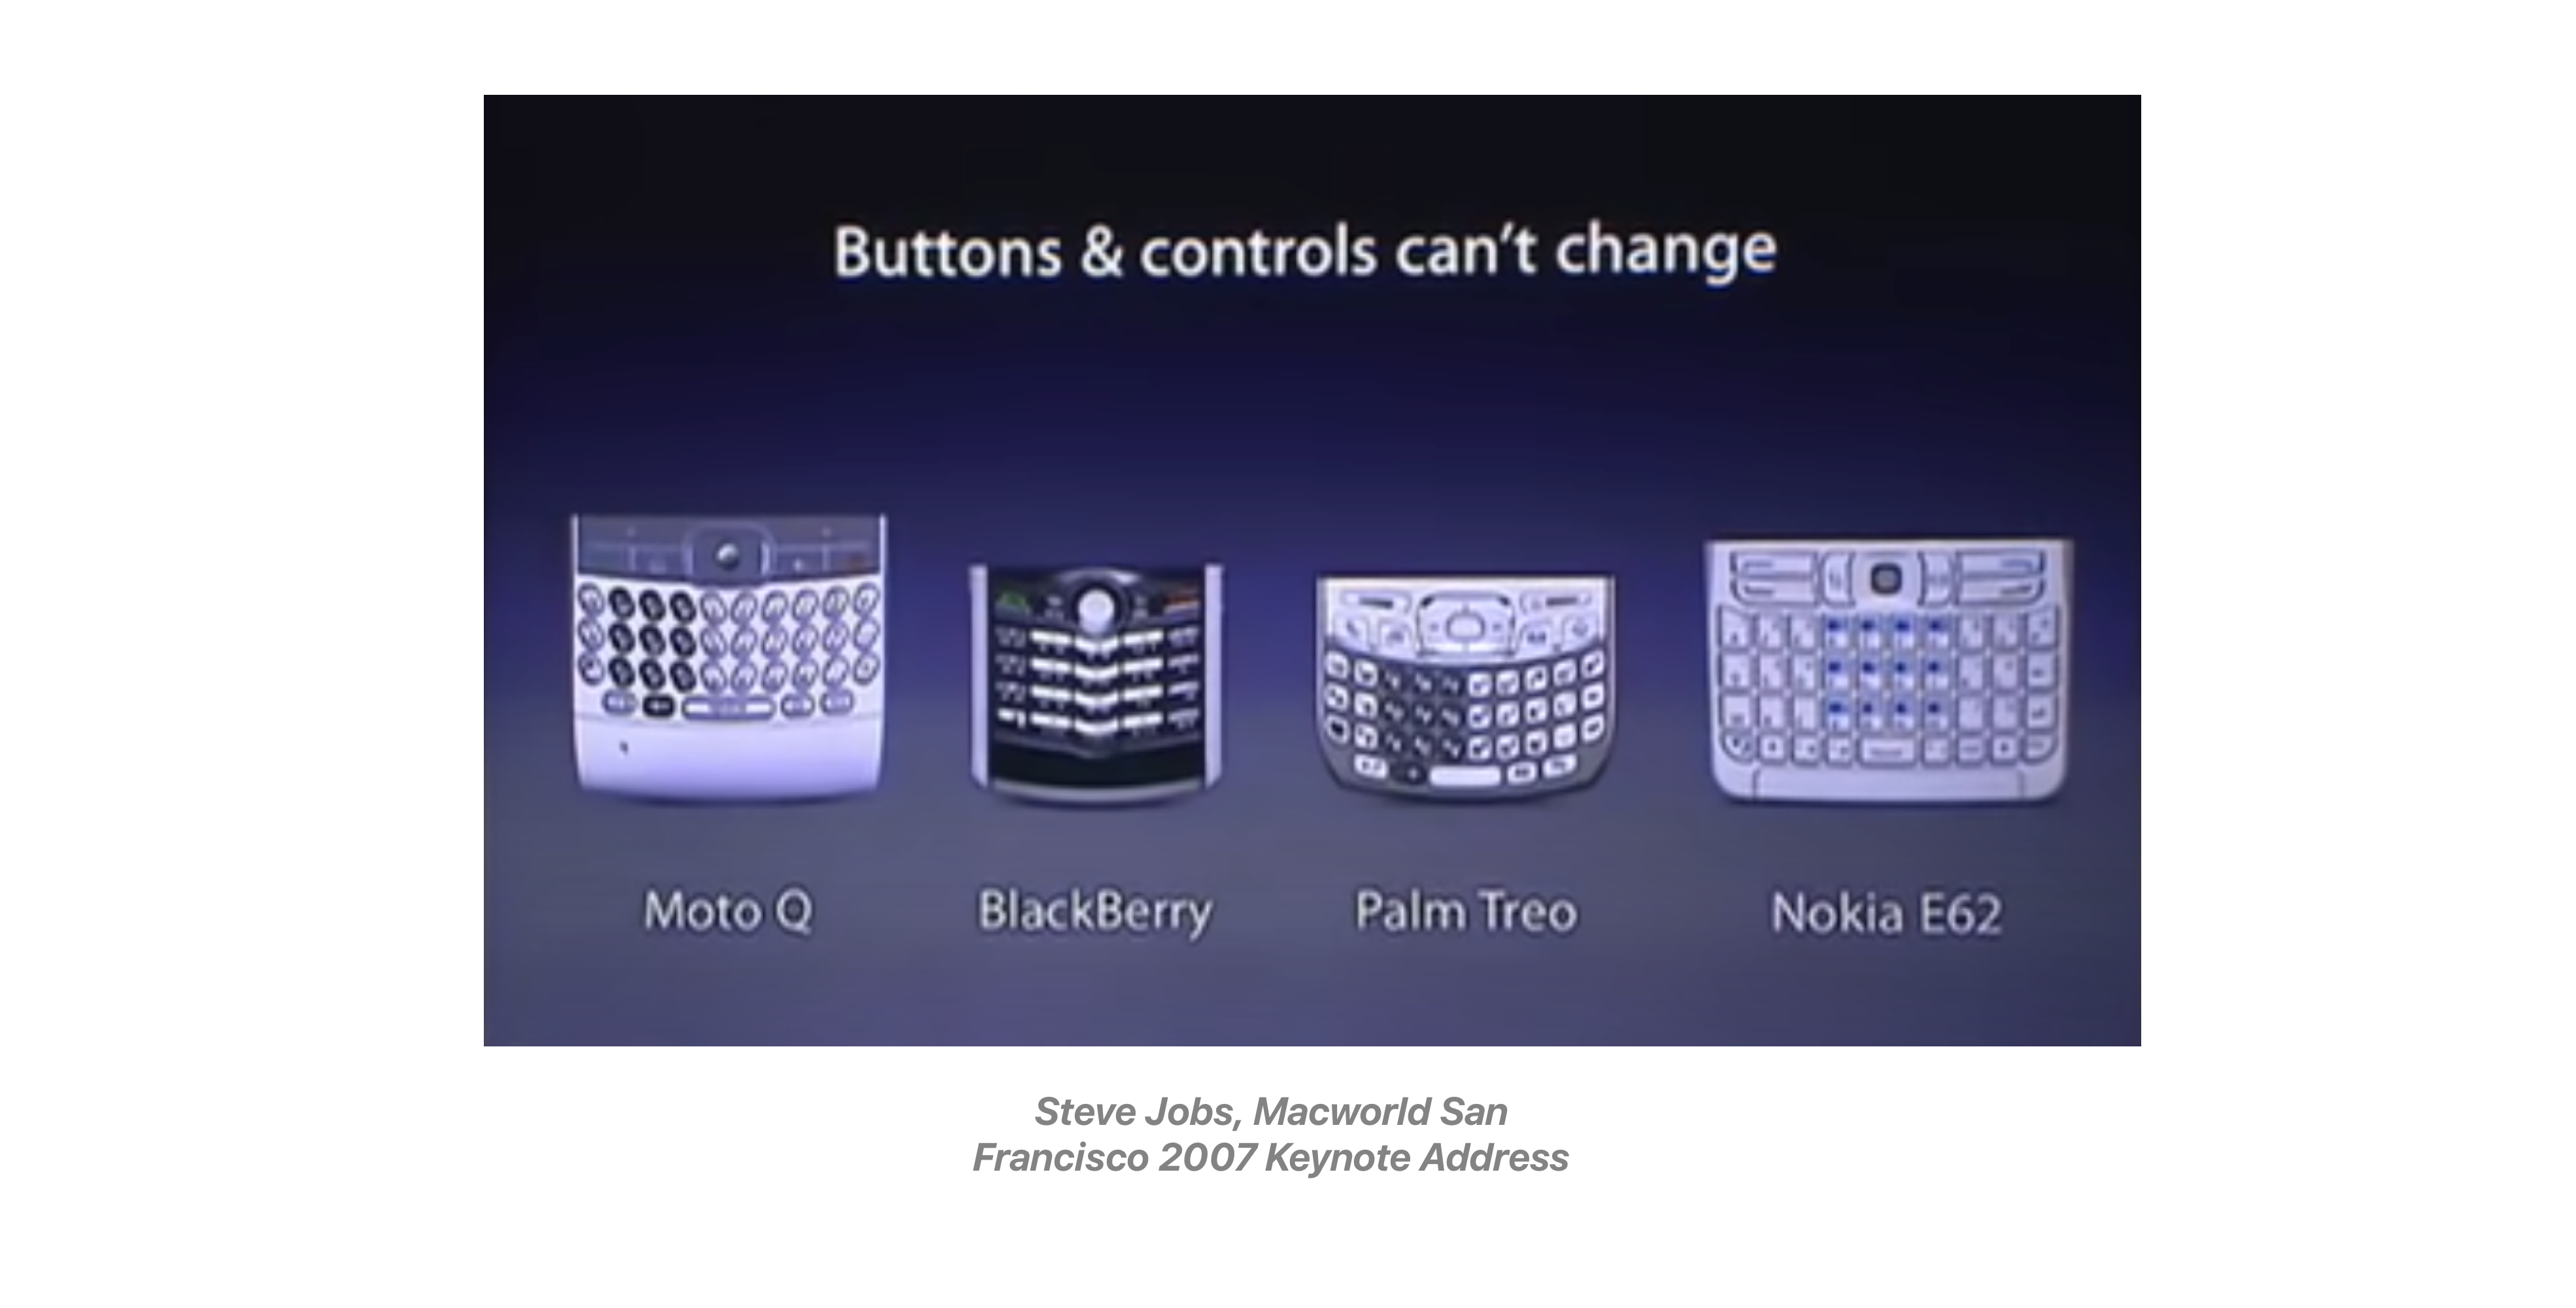
Well off the bat, Apple solved this problem in 2007, with the launch of the iPhone, by removing all of the buttons from the screen, instead allowing room for apps to control how they are set controlled.
This is the right solution. Nevertheless, there are today a group of people, professionals, experts and some general consumers, that need to interact with a computer/and a keyboard in order to complete their daily tasks.
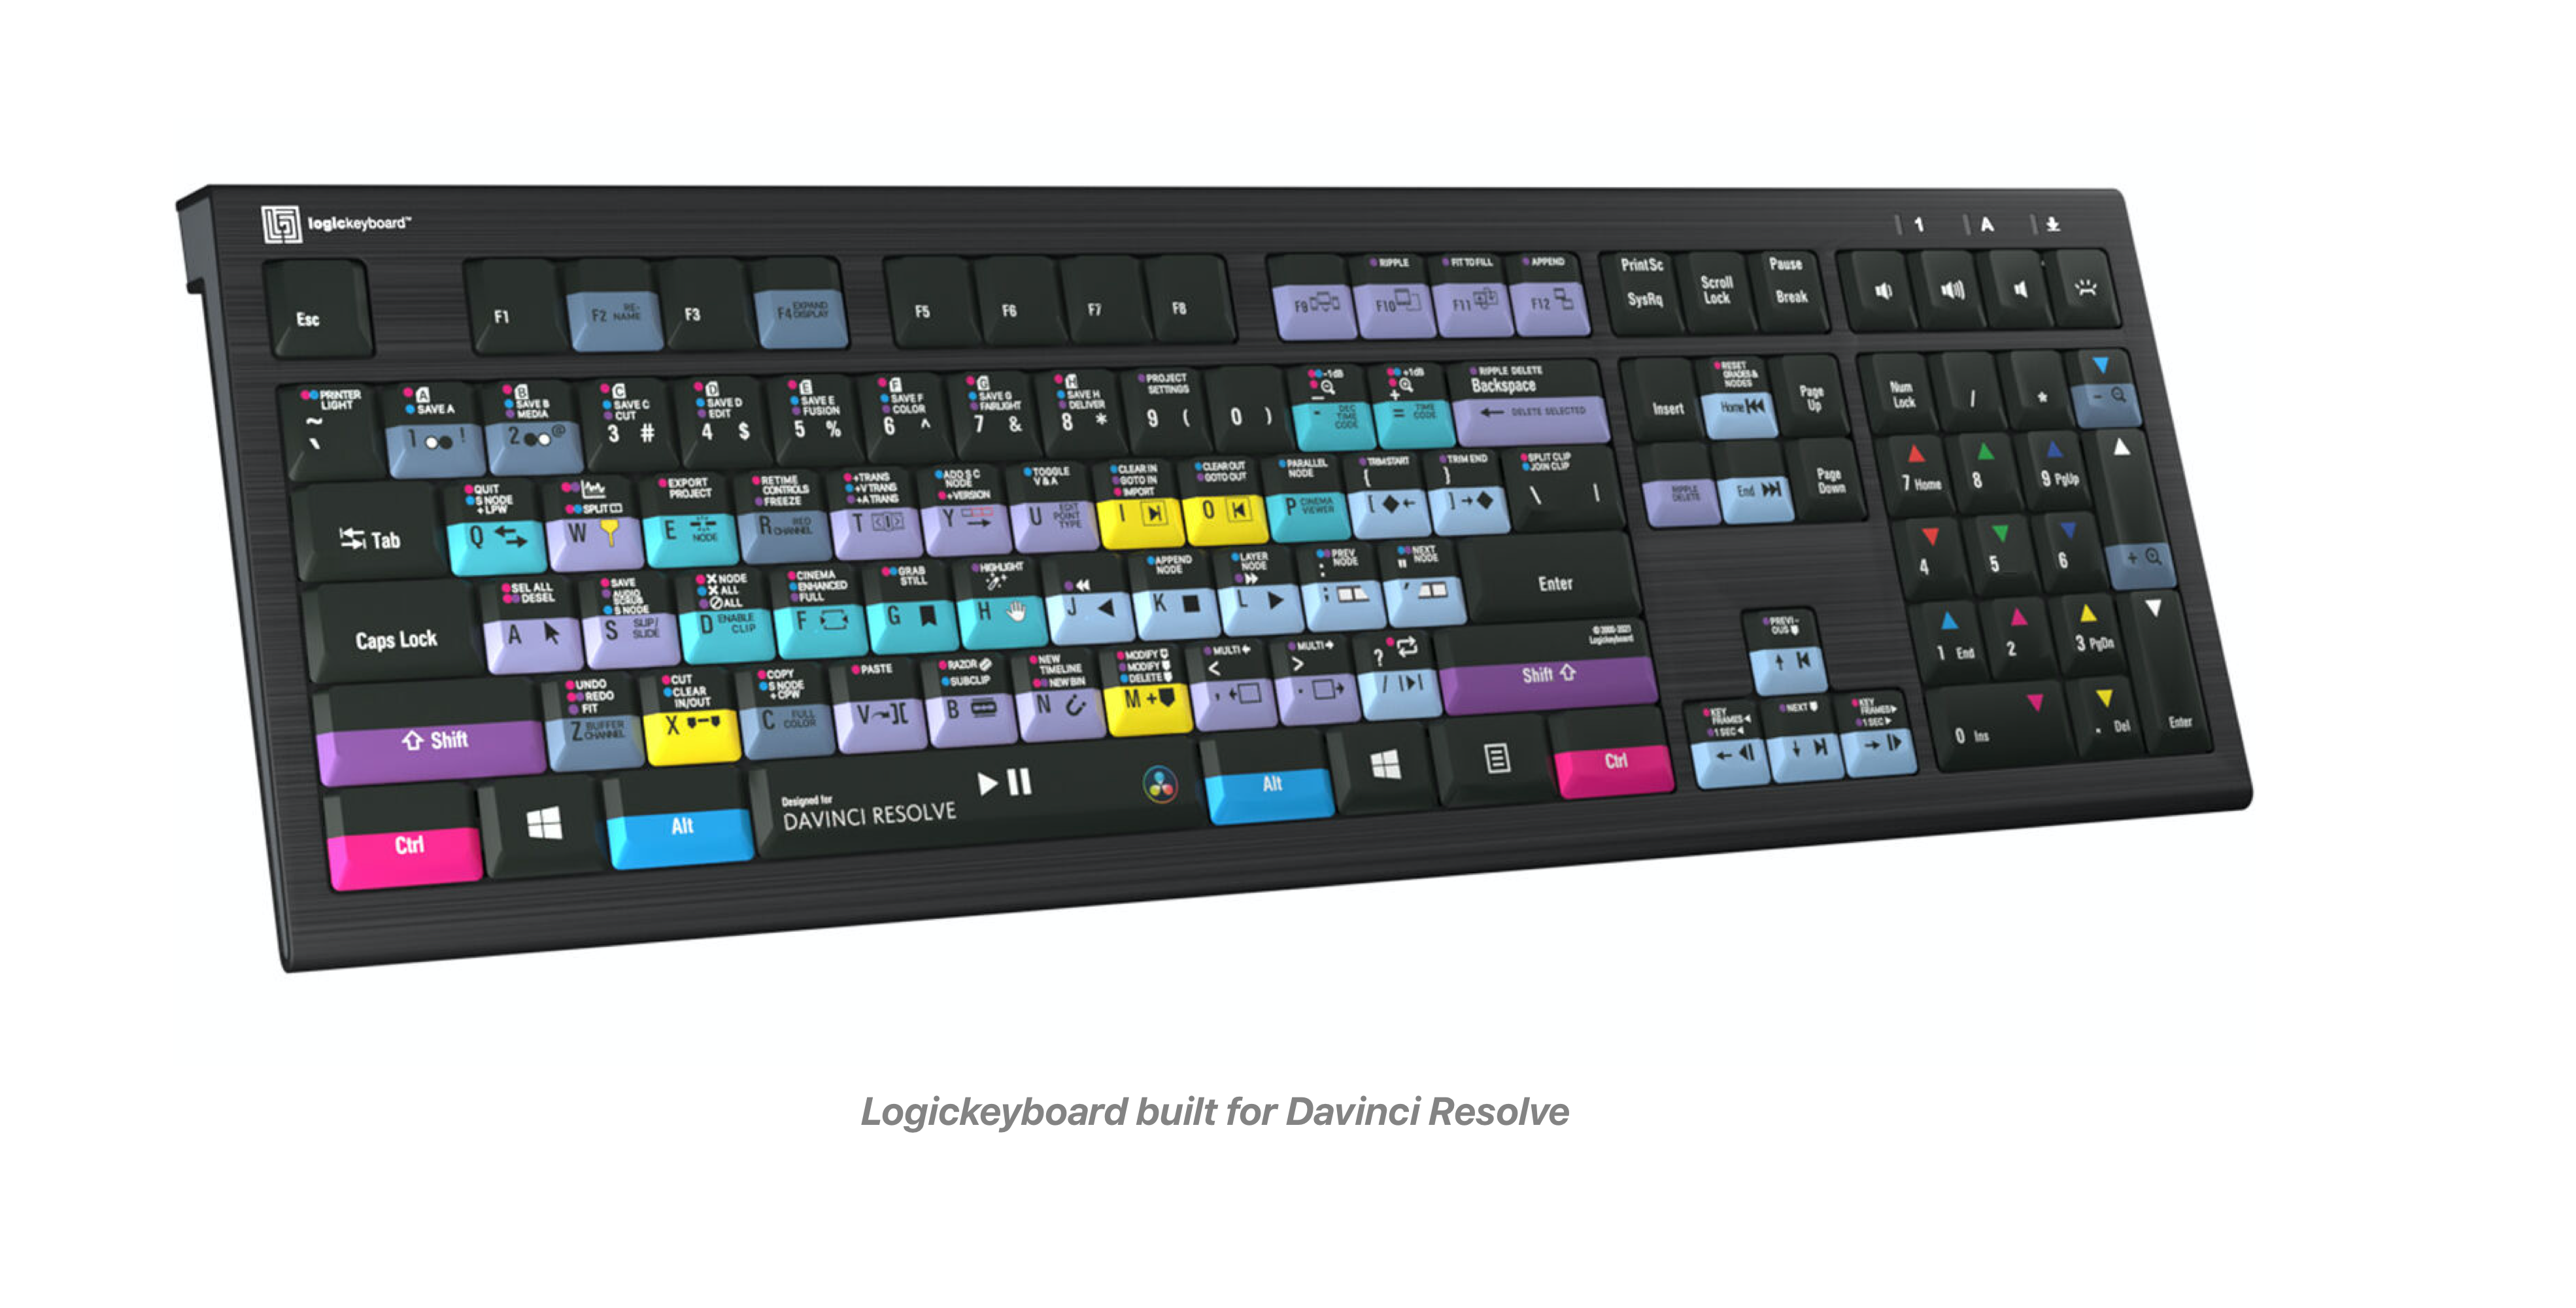
There is also the Logickeyboard, as well as a various collection of keyboard covers, that also aim to solve the problem by mapping all of the app’s shortcuts directly onto the keyboard. However these solutions have their own intrinsic issues.
1. The keyboard is visually complicated
2. Requires a seperate piece of hardware.
3. It is application specific, OK for experts, but not for general consumers.

Other approaches including ExposeHK, IconHK, and Waldon Bronchart’s Application Shortcut Mapper, although they don’t map directly on the users keyboard, are all valid approaches aiming to solve this problem, and served as valuable reference companions while designing the app.
–
Starting to Design
With this in mind, I started designing a solution that didn’t solve the core issue of contextual relevance, but instead made it easier and faster to view a shortcuts pattern, shortening the time of the Performance Dip, making a user more likely to learn a command.
After designing the list, I realized that in order for a user to interact with a list, it would require them to take their hands off of the keyboard, reducing flow from the application at hand.
So I started focusing in another direction, leading towards explorations, with the aim of solving, the recontextualizing of keyboard shortcuts.

I started out by created a color scheme which I mapped to the modifier keys, this would indicate on the keyboard, which states could be made active. I also looked at other color schemes, made by artists and designers including Spot Paintings works by Damien Hirst, and primary color schemes from the Bauhaus. I also learned about a research paper from the National Research Foundation of Korea, which discussed that warmer color schemes, can help enhance spatial memory.
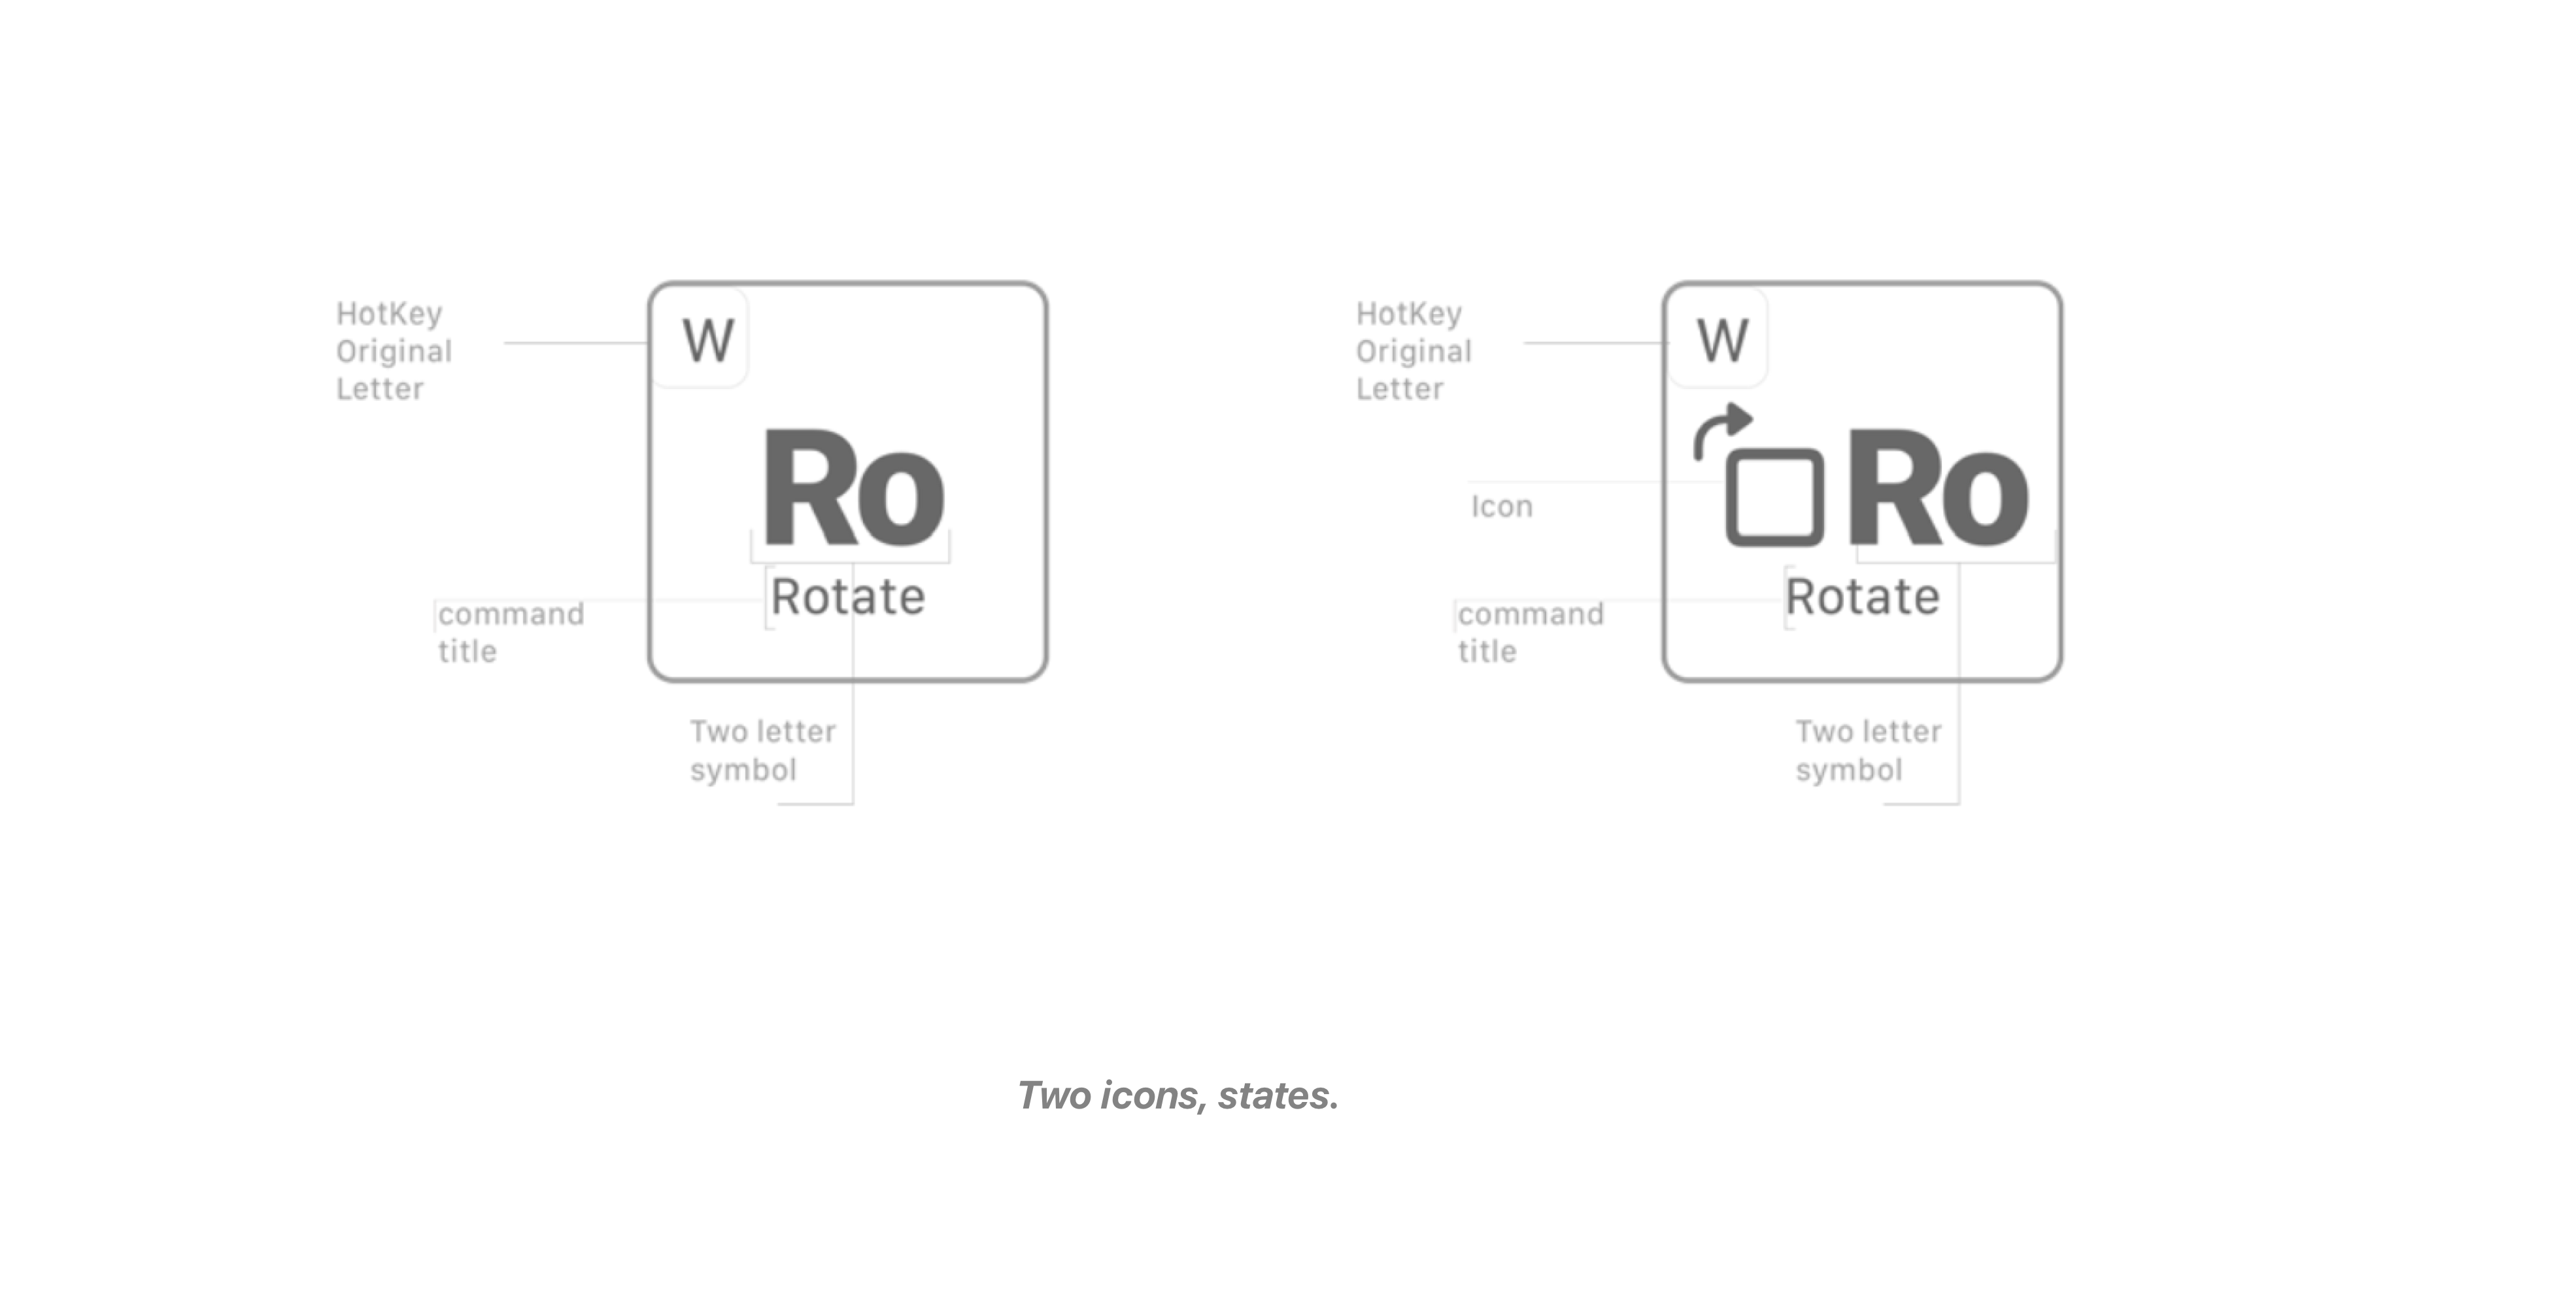
In addition, I referenced the periodic table, since I realized the similarity between the periodic table and the computer keyboard, and wanted to understand how they represented a large amount of information in small amount of space. So I created a system to represent each shortcut on the keys. The system provided both a visual guide and a naming system for how to position symbols and their keys.
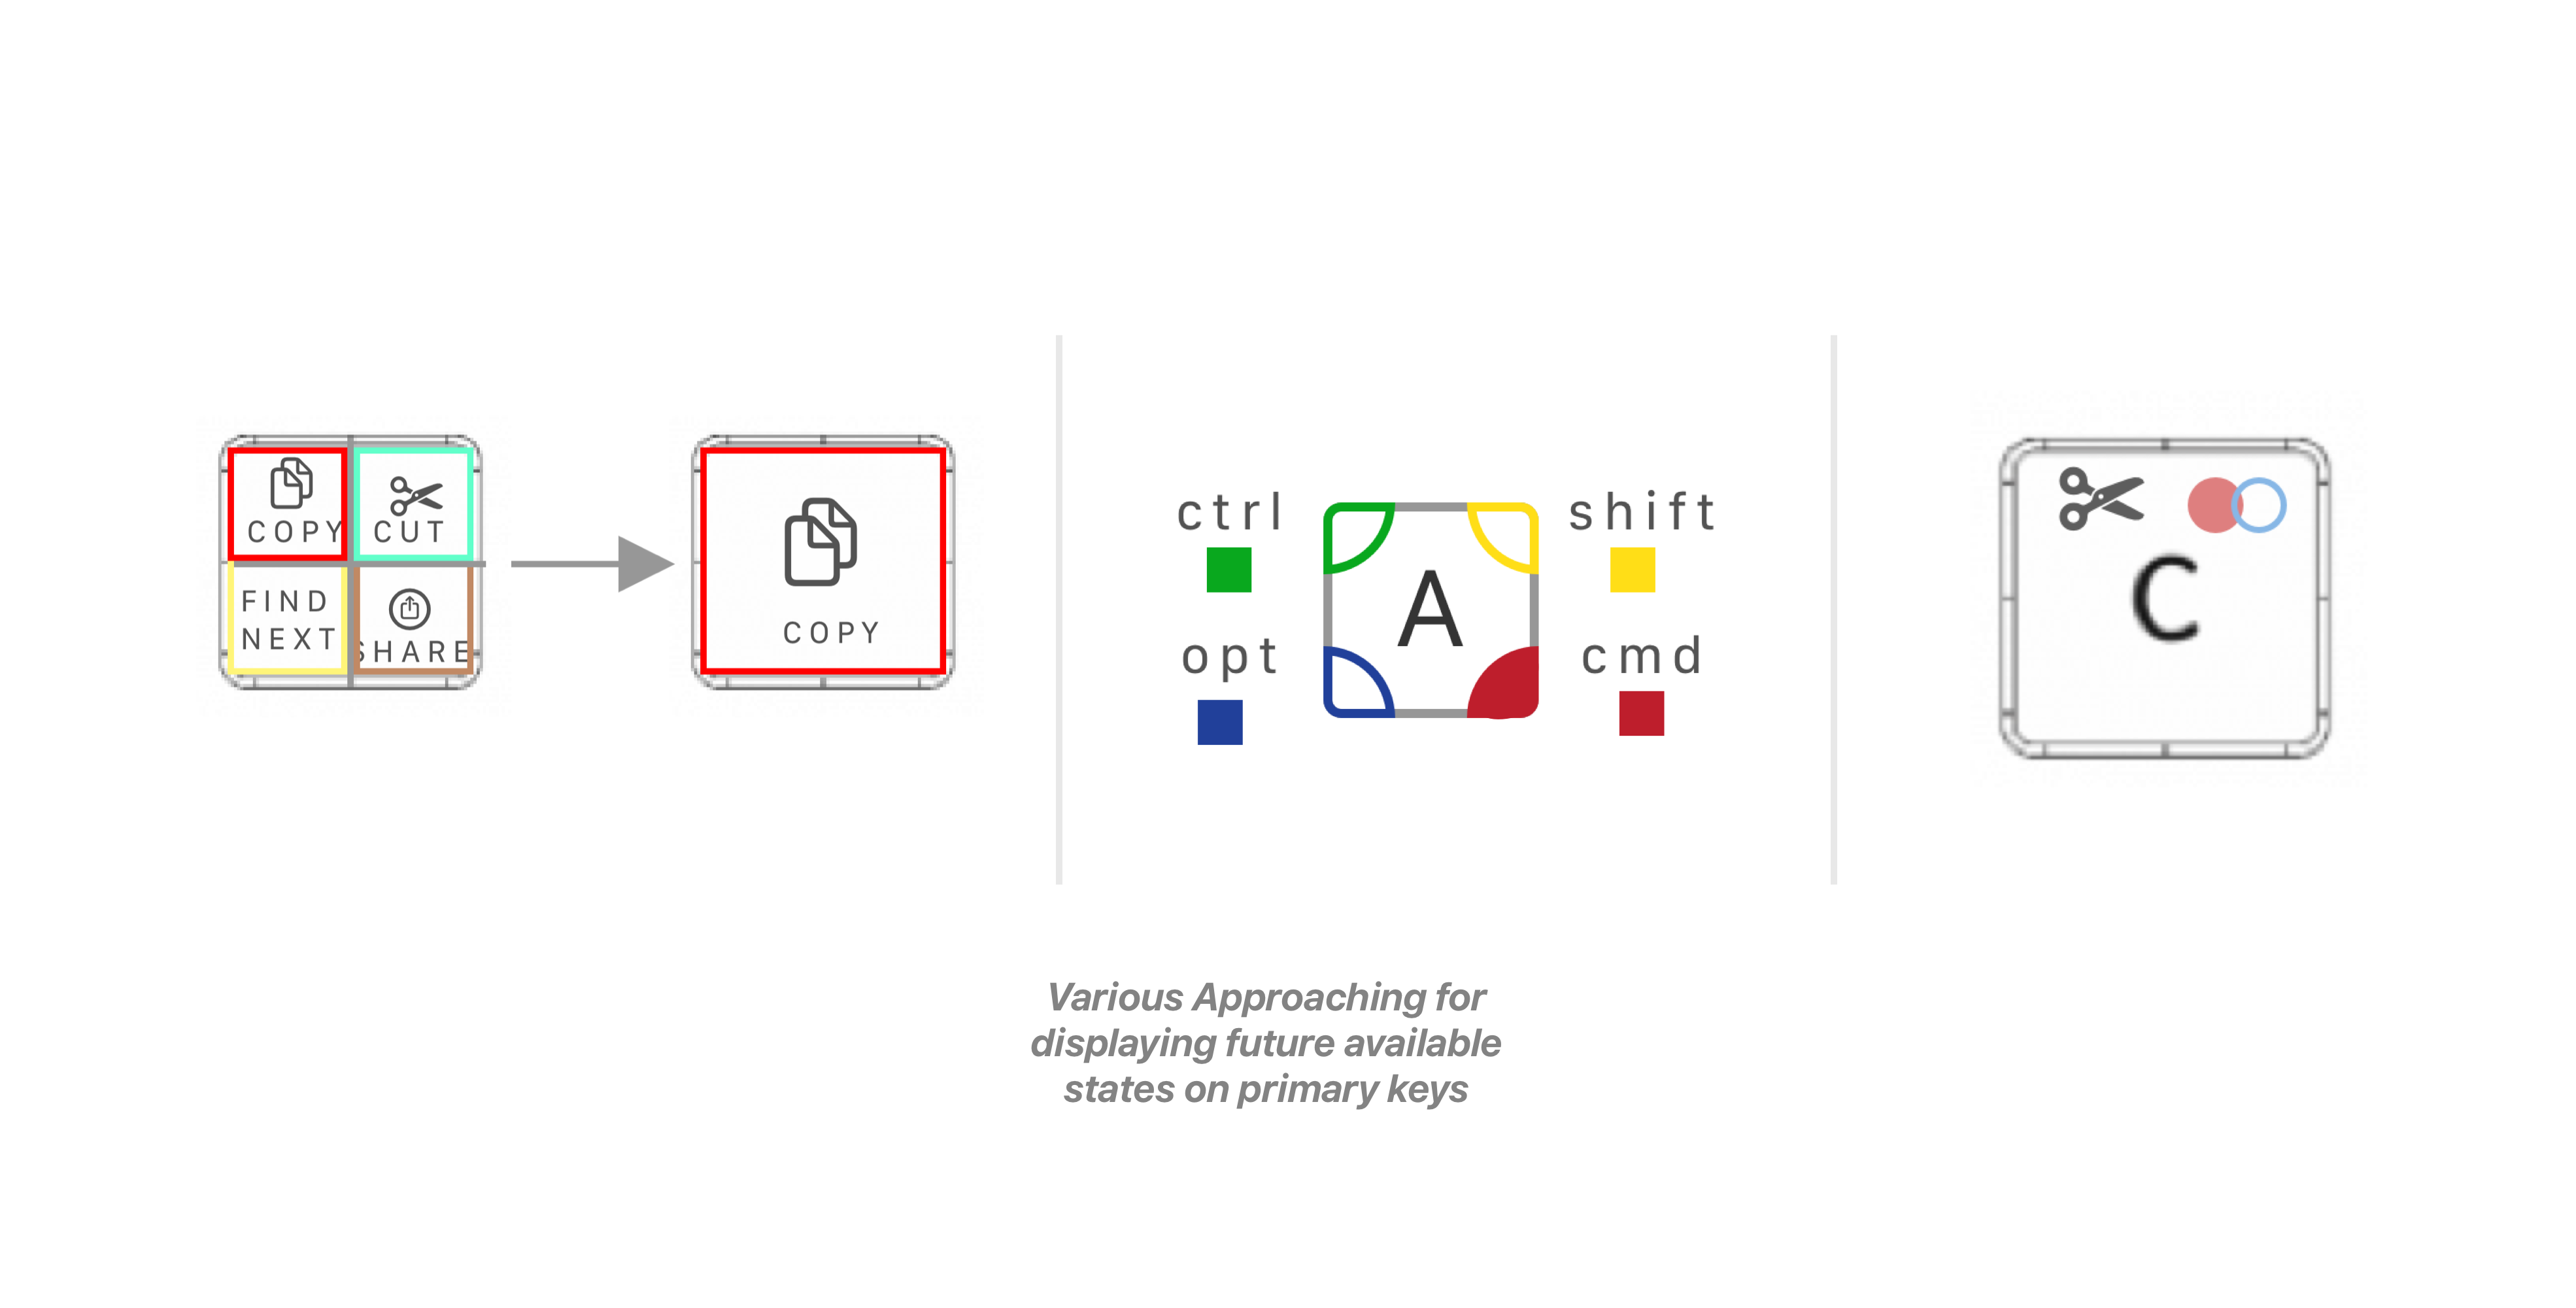
Next, I noticed that in order for a user to see available future commands, there would have to be some kind of indicator on the key, informing what future states would be available. I learned from the IconHK research paper, to map the required modifier keys to their spatial positioning on the primary key. However, I soon realized that IconHK was solving a different problem.
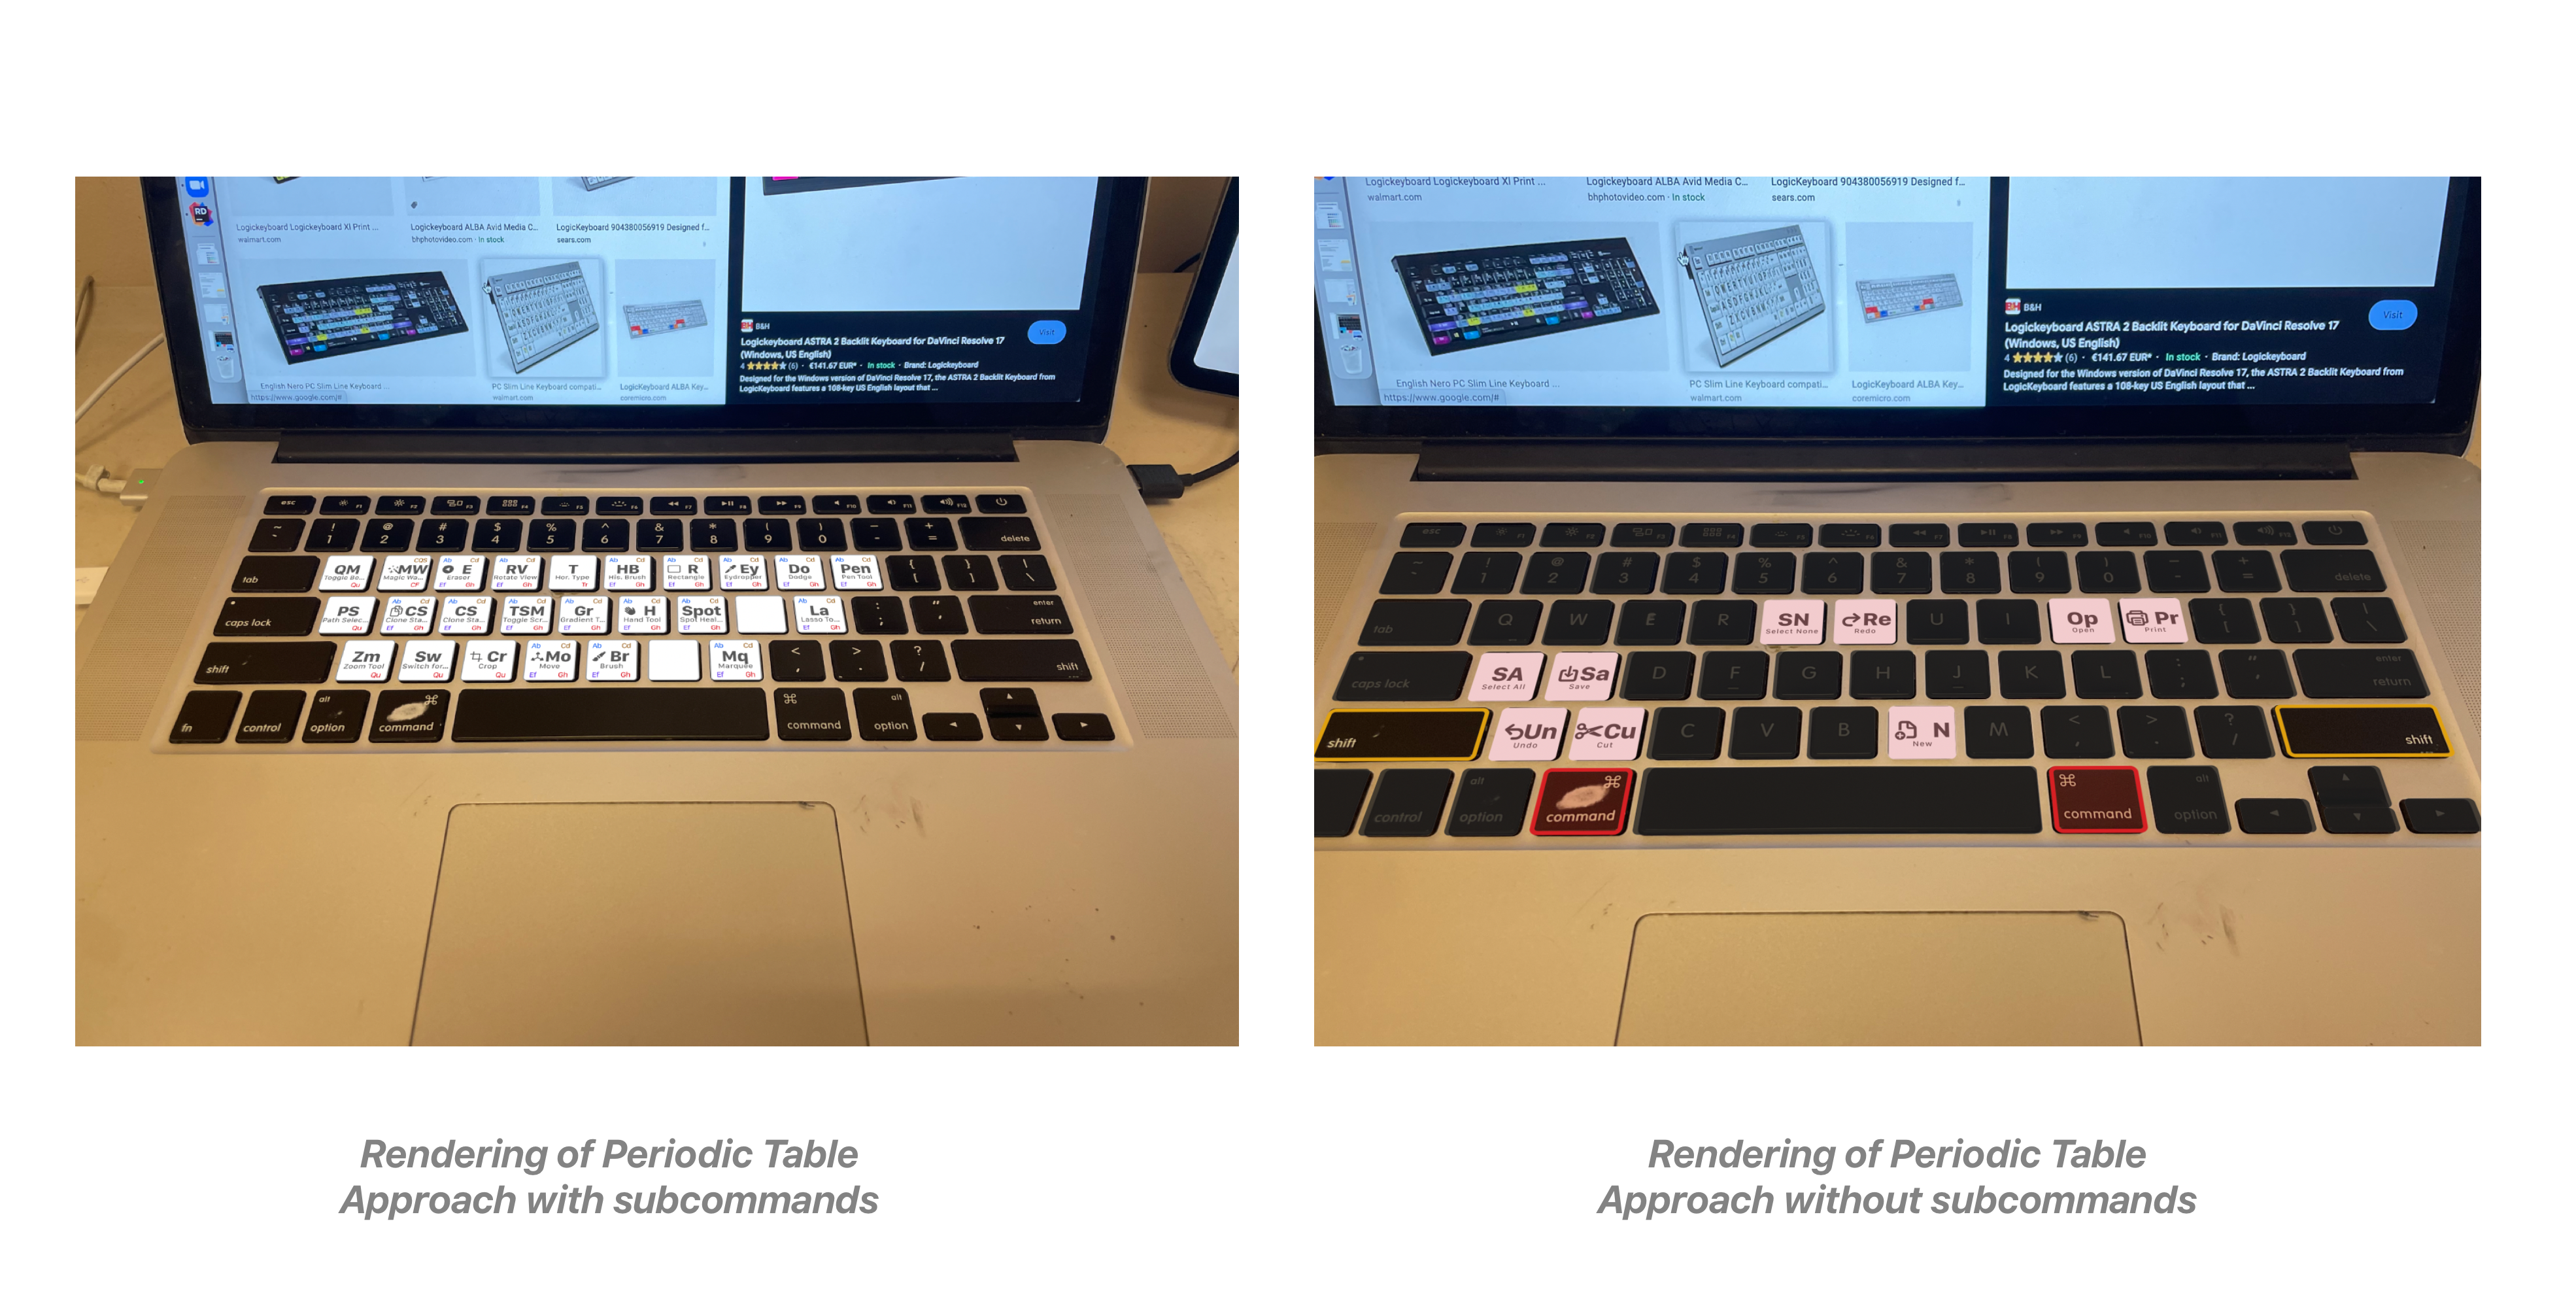
And after a lot of back and fourth and iteration that I am not discussing here, for brevity, I put together a rendering that enabled users to view all shortcuts in an application at first glance, and be able to contextaully understand them.
–
After a good nights sleep, I came back to my designs - looked at them and thought - “Who the heck would want to use this.” Thus, starting all over again –
Introducing Motion
After Effects Concept
This time I decided to use After Effects to help me concept the design by implementing motion within the keys. During this I realized that the keyboard should look exactly like the physical keyboard - to not visually overwhelm the user - and use simple animations on the keys to highlight which shortcuts are available.
With this I felt comfortable enough with the design direction, that I was ready to start understanding how to approach the project architecturally.
Implementing the Initial Architecture
So far, I knew that I wanted to have two separate Unity builds. One running a Sample App, on the desktop, emulated a demonstration of what would be a more complex app in the future –– and also an iOS based AR App, which would leverage AR Foundation/AR Kit to place an Augmented Reality keyboard over the users physical keyboard. And in order to connect both the AR Keyboard and the Desktop App - I decided to use Normcore, a powerful multiplayer networking framework, built for XR, and it also provided a good opportunity to get to know the framework.
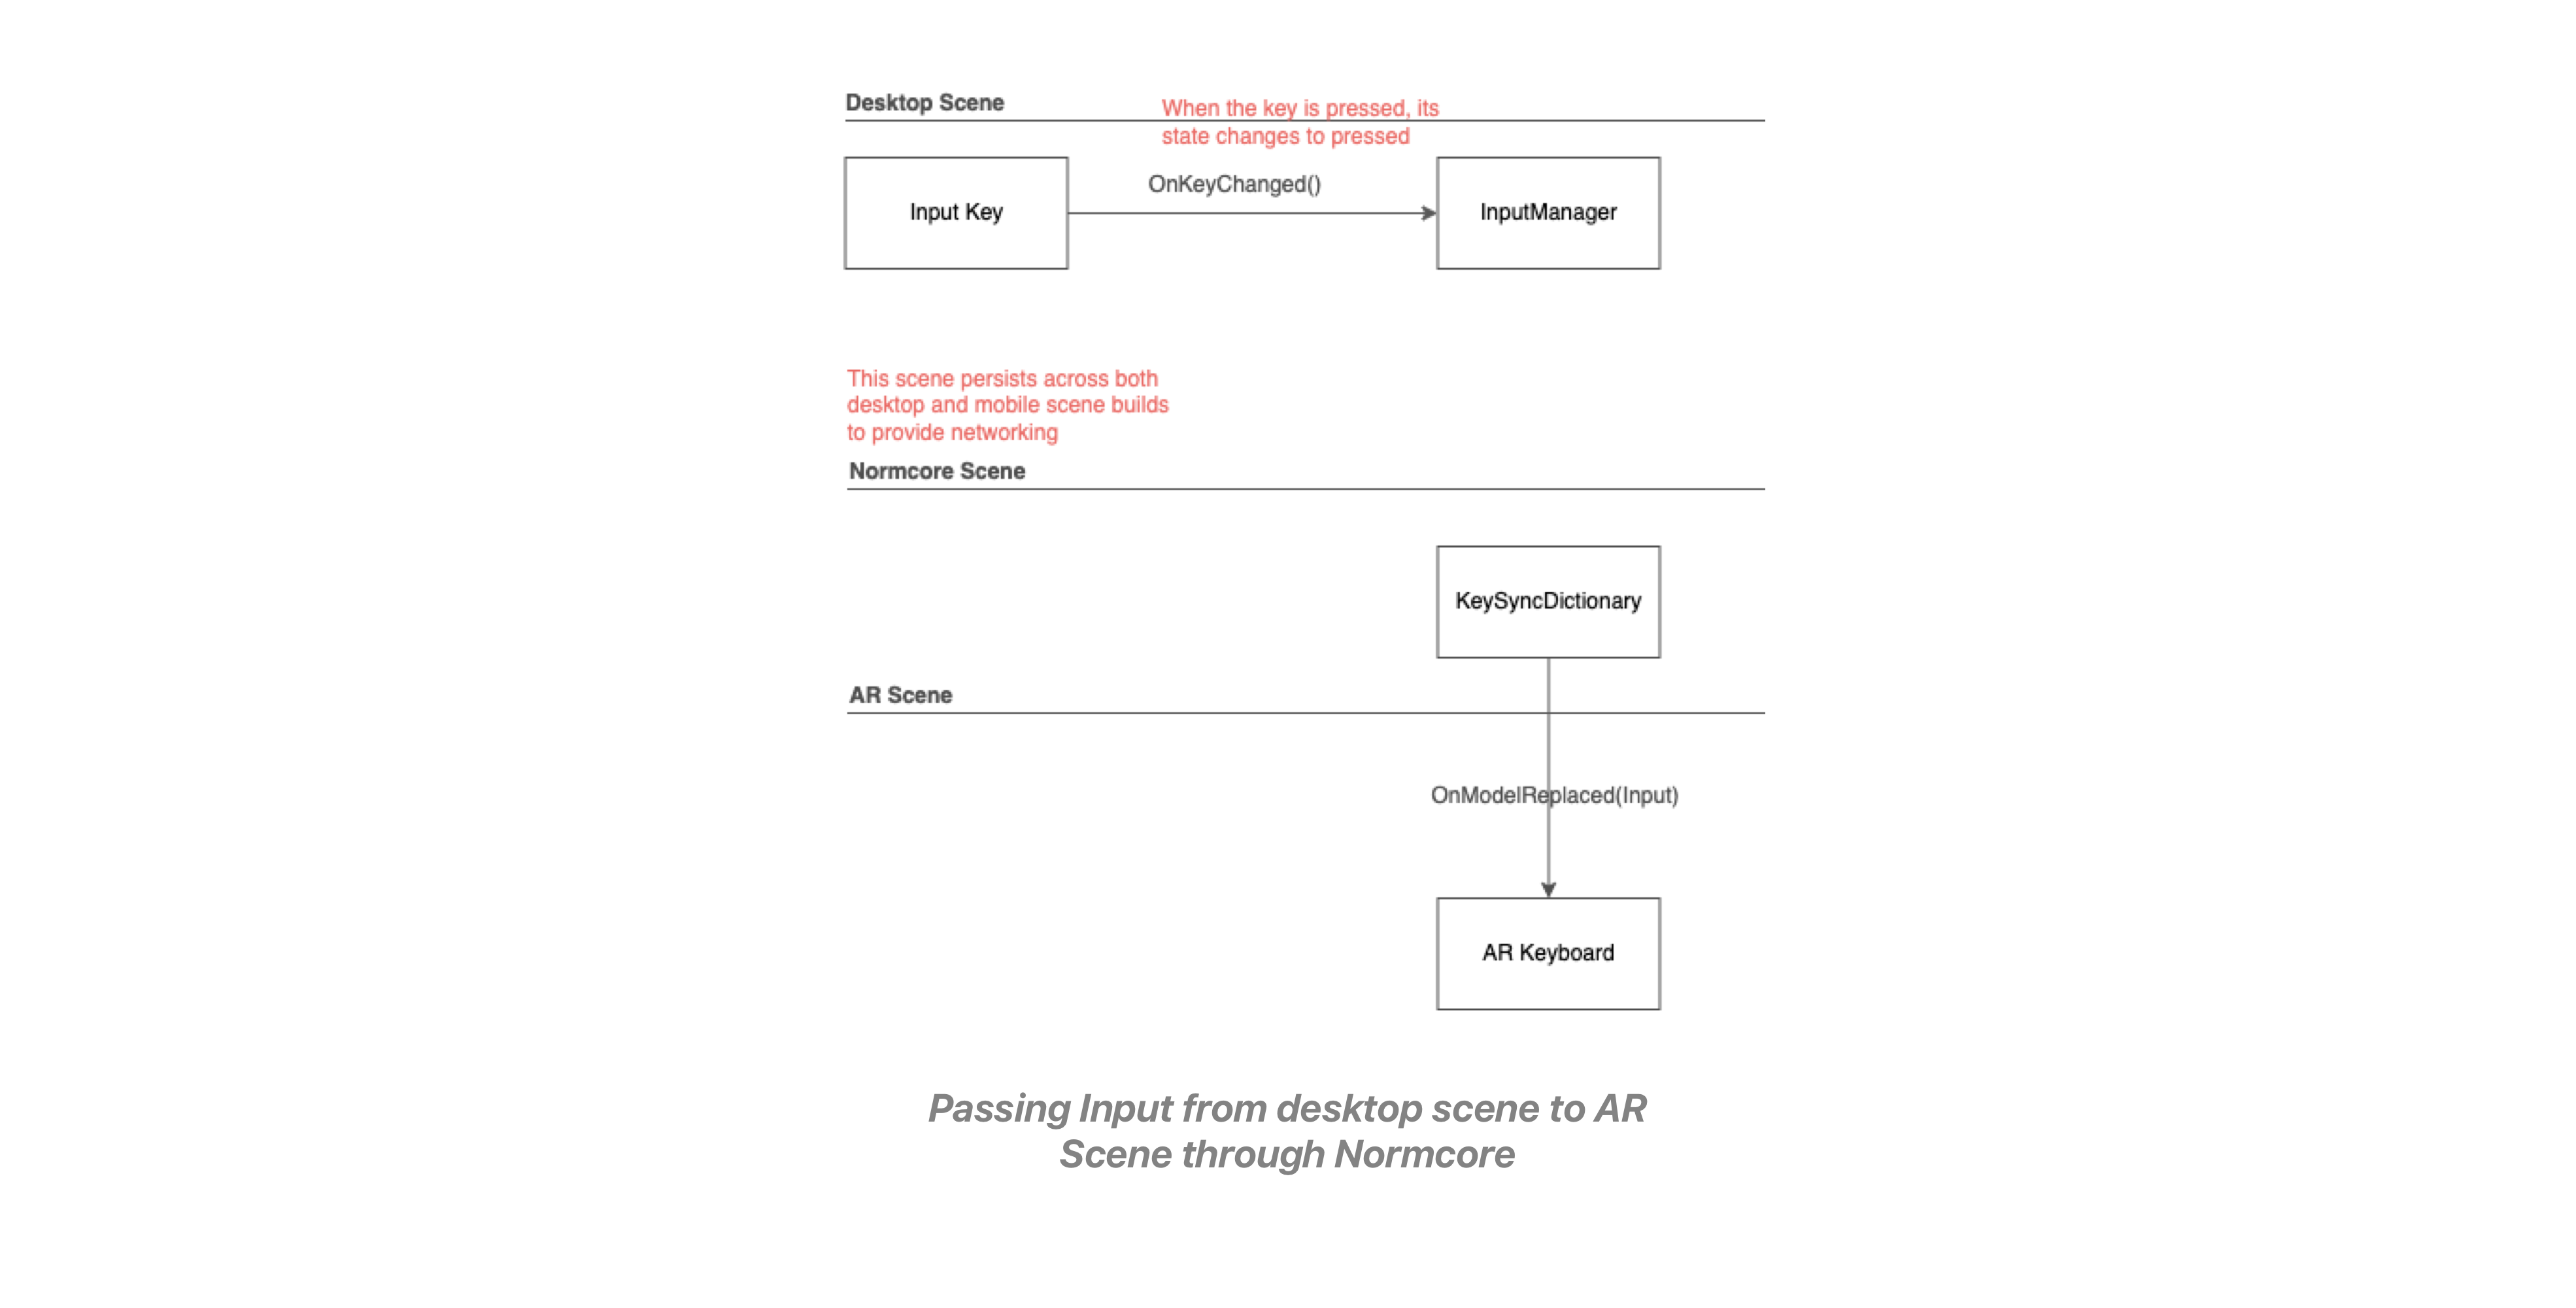
From the desktop App - I kept track of keypresses by subscribing a Key Input Manager to each instance of a Key and when the key was pressed the input manager would then get notified and Normcore would update its dictionary. The Normcore dictionary held a Key Value Pair of each of the keys on the keyboard - and passed the keyboard key and its value to the AR Keyboard so that it could updated appropriately.

The AR Keyboard then received the Normcore input and passed the change input to HandleInput() in the main ARKeyboard class. This was primarily to control the Ambient Mode (Main state machine of the app) state machine.
The state machine checked to see if the input was appropriate to switch to the next state, and if it was, the next state of shortcuts would be instantiated. For example if the Command Key Pressed input was receive the state machine would enter command state, all keys with shortcuts available on the ‘Command State’ would be displayed on the keys, (Cut, Copy, Paste, etc…)
Getting Started on Implementation
With the initial architecture ‘in-place’ I began implementing it in code.
Preview of local screne running with shortcuts
First I wanted to make sure the various architectural concepts that I outlined made sense, so I created a local Unity Scene – which had both a desktop and a keyboard, and laid out the architecture, this way I could focus on the core functionality, without yet having to worry about Normcore or AR Foundation.
 Asking a question to the Normcore team on the Discord Channel
Once that was complete, I started setting up Normcore, which I learned through the documentation, and by leveraging the Discord channel. In order to have Normcore persist across two separate apps, I asynchronously loaded a common networking scene - on both the desktop and mobile apps - and the keypresses were now registering between two Unity builds through a separate Desktop build on the local scene.
Next I implemented AR Foundation where I used Horizontal Plane Tracking (would like to use object tracking in future for more accurate initial placement) to place the keyboard, and enabled occlusion, so that the users hand will appear to be behind the virtual keyboard.
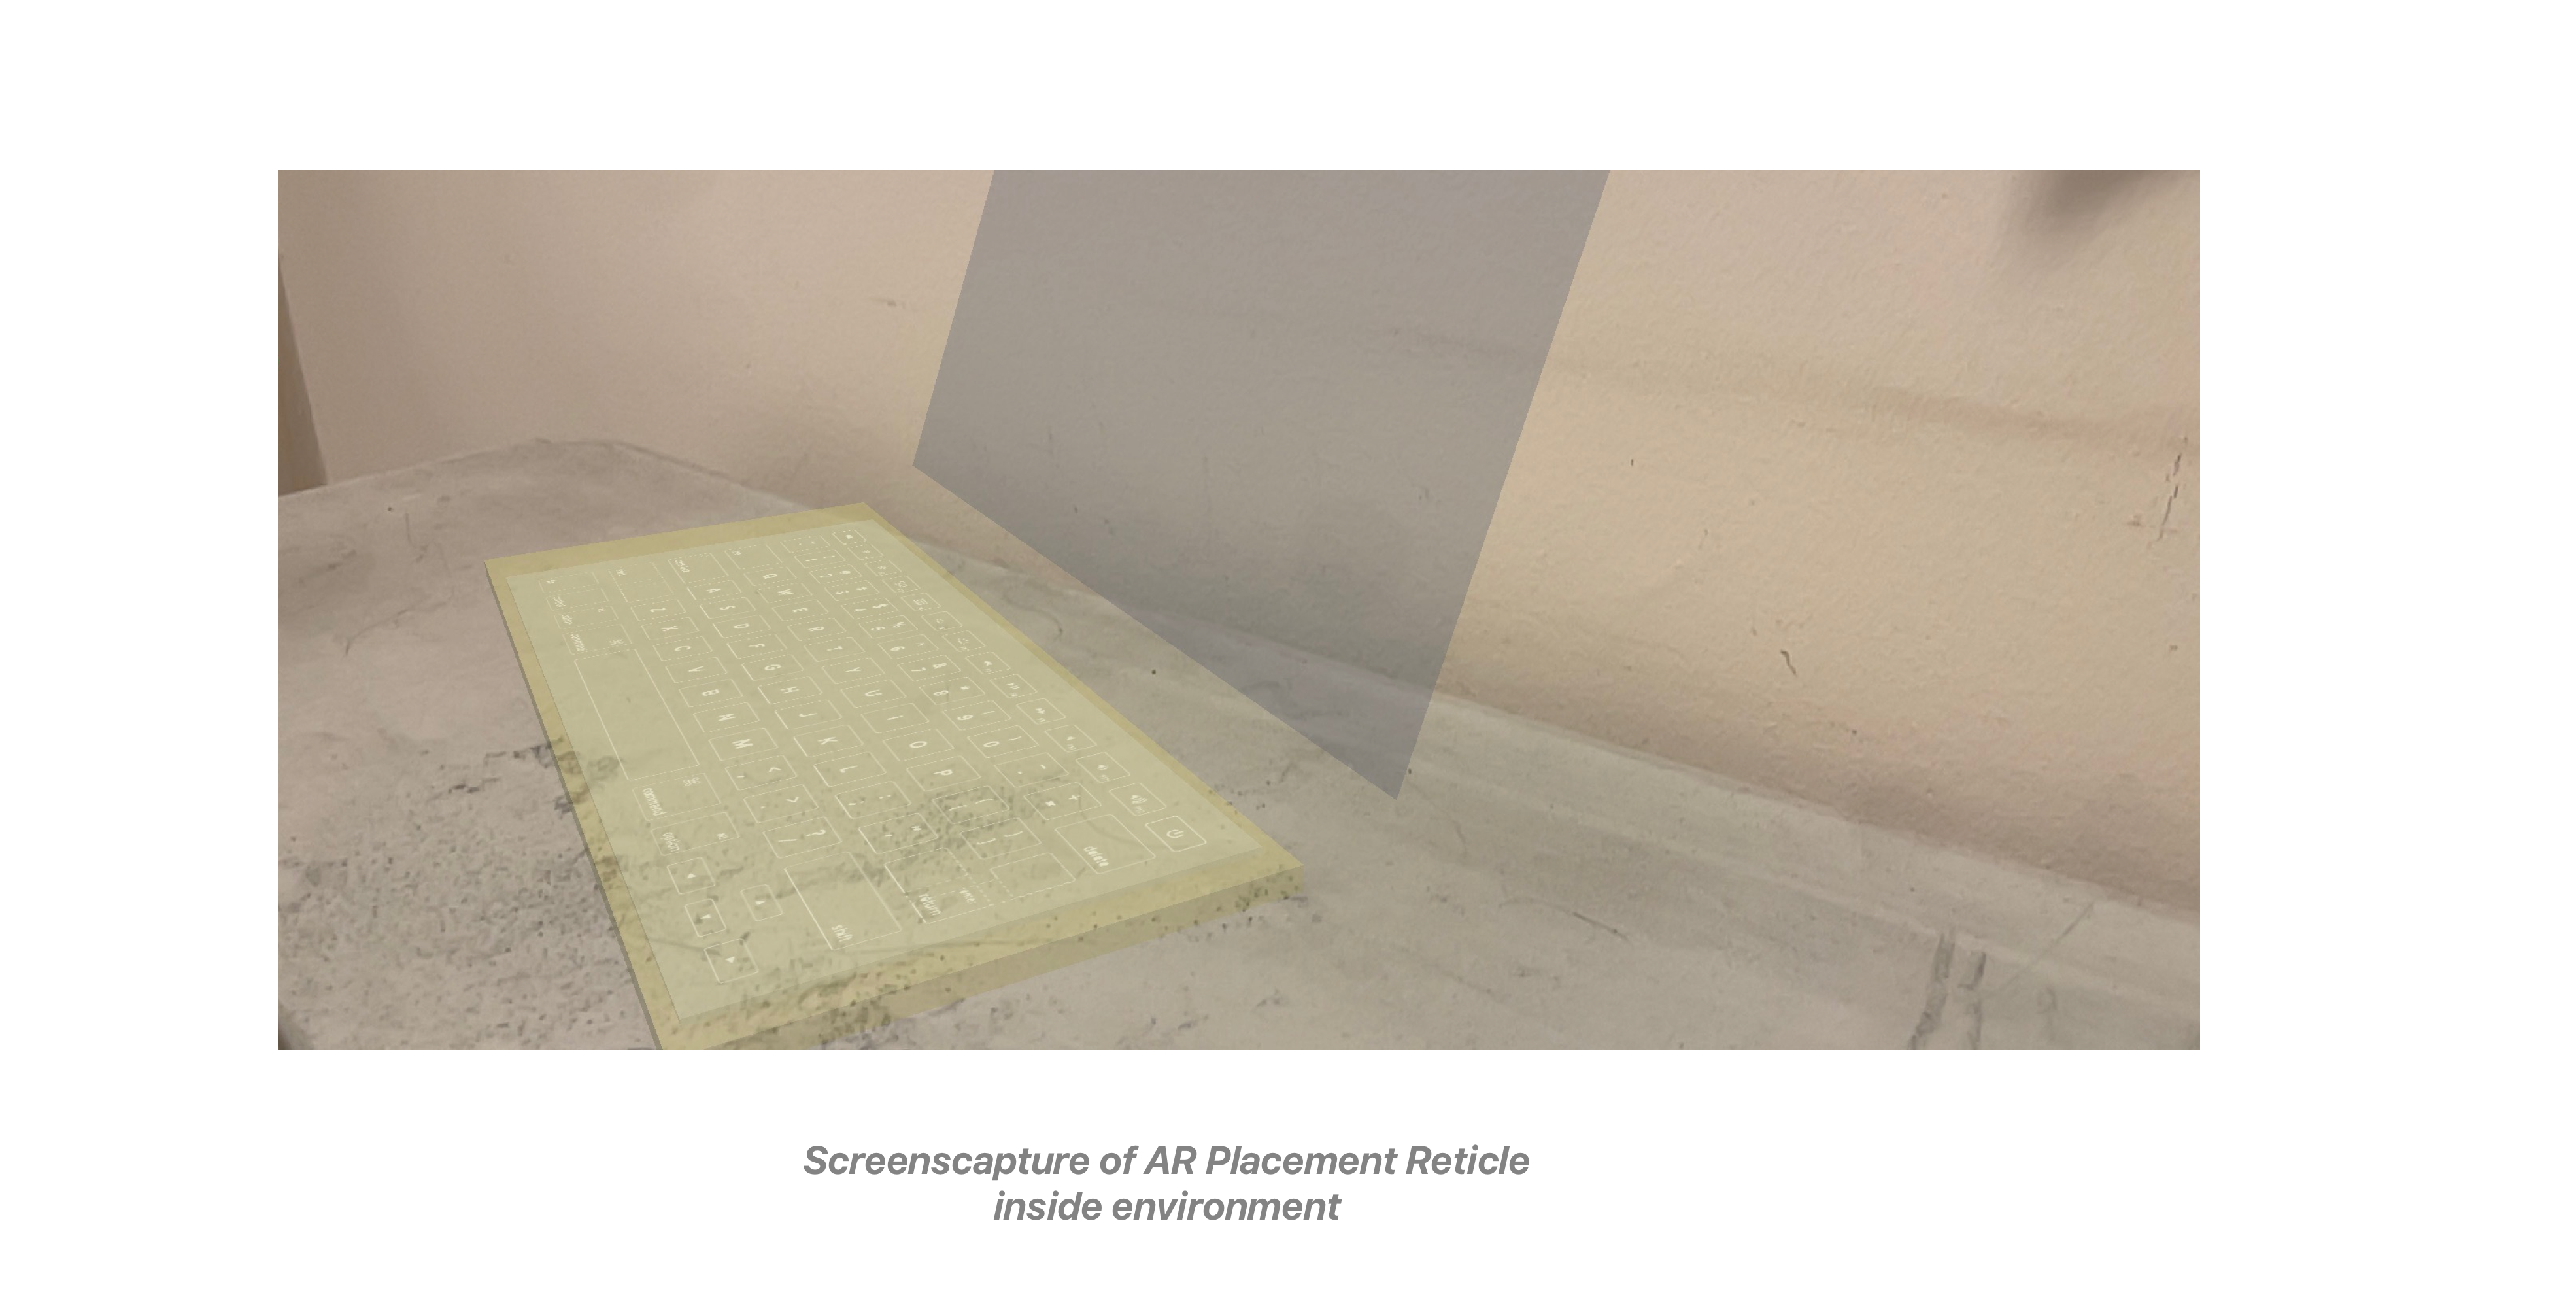
I created a placement reticle with a keyboard texture and leveraged XR Interaction Toolkit, so to accurately place the keyboarding in positioning over the ‘physical’ keyboard.
After both, AR Foundation and Normcore were set up, I stepped away from the local scene
And implemented the Desktop Scene, which was based off of the Text Editor Asset from the Unity Asset Store. The asset provide a text editor interface with simple built in shortcuts, giving me a base to start exploring the interaction, between the desktop app and the AR Keyboard, with aims to add more complex app implementation in the future.
And then I created the AR App, which was built around the ARKeyboard prefab - and in order to test quickly - without having to build in AR each time, I used the AR foundation remote app, but also create a “Sandbox Scene” that acted just as the AR App, but with in the Unity Environment.

I started creating the AR Keyboard. In order to do this, I created to main prefab varients, one for the modifier key, one for the primary key. The parent prefabs, both had generic hierarchies, including for main text, secondary text (optional), and secondary image (optional). That enabled me too easily animate all groups of keys at once. I also designed the keys, so that the material would match the keyboard, and it’s font (VAG Rounded), and image, would seamlessly align with the keys
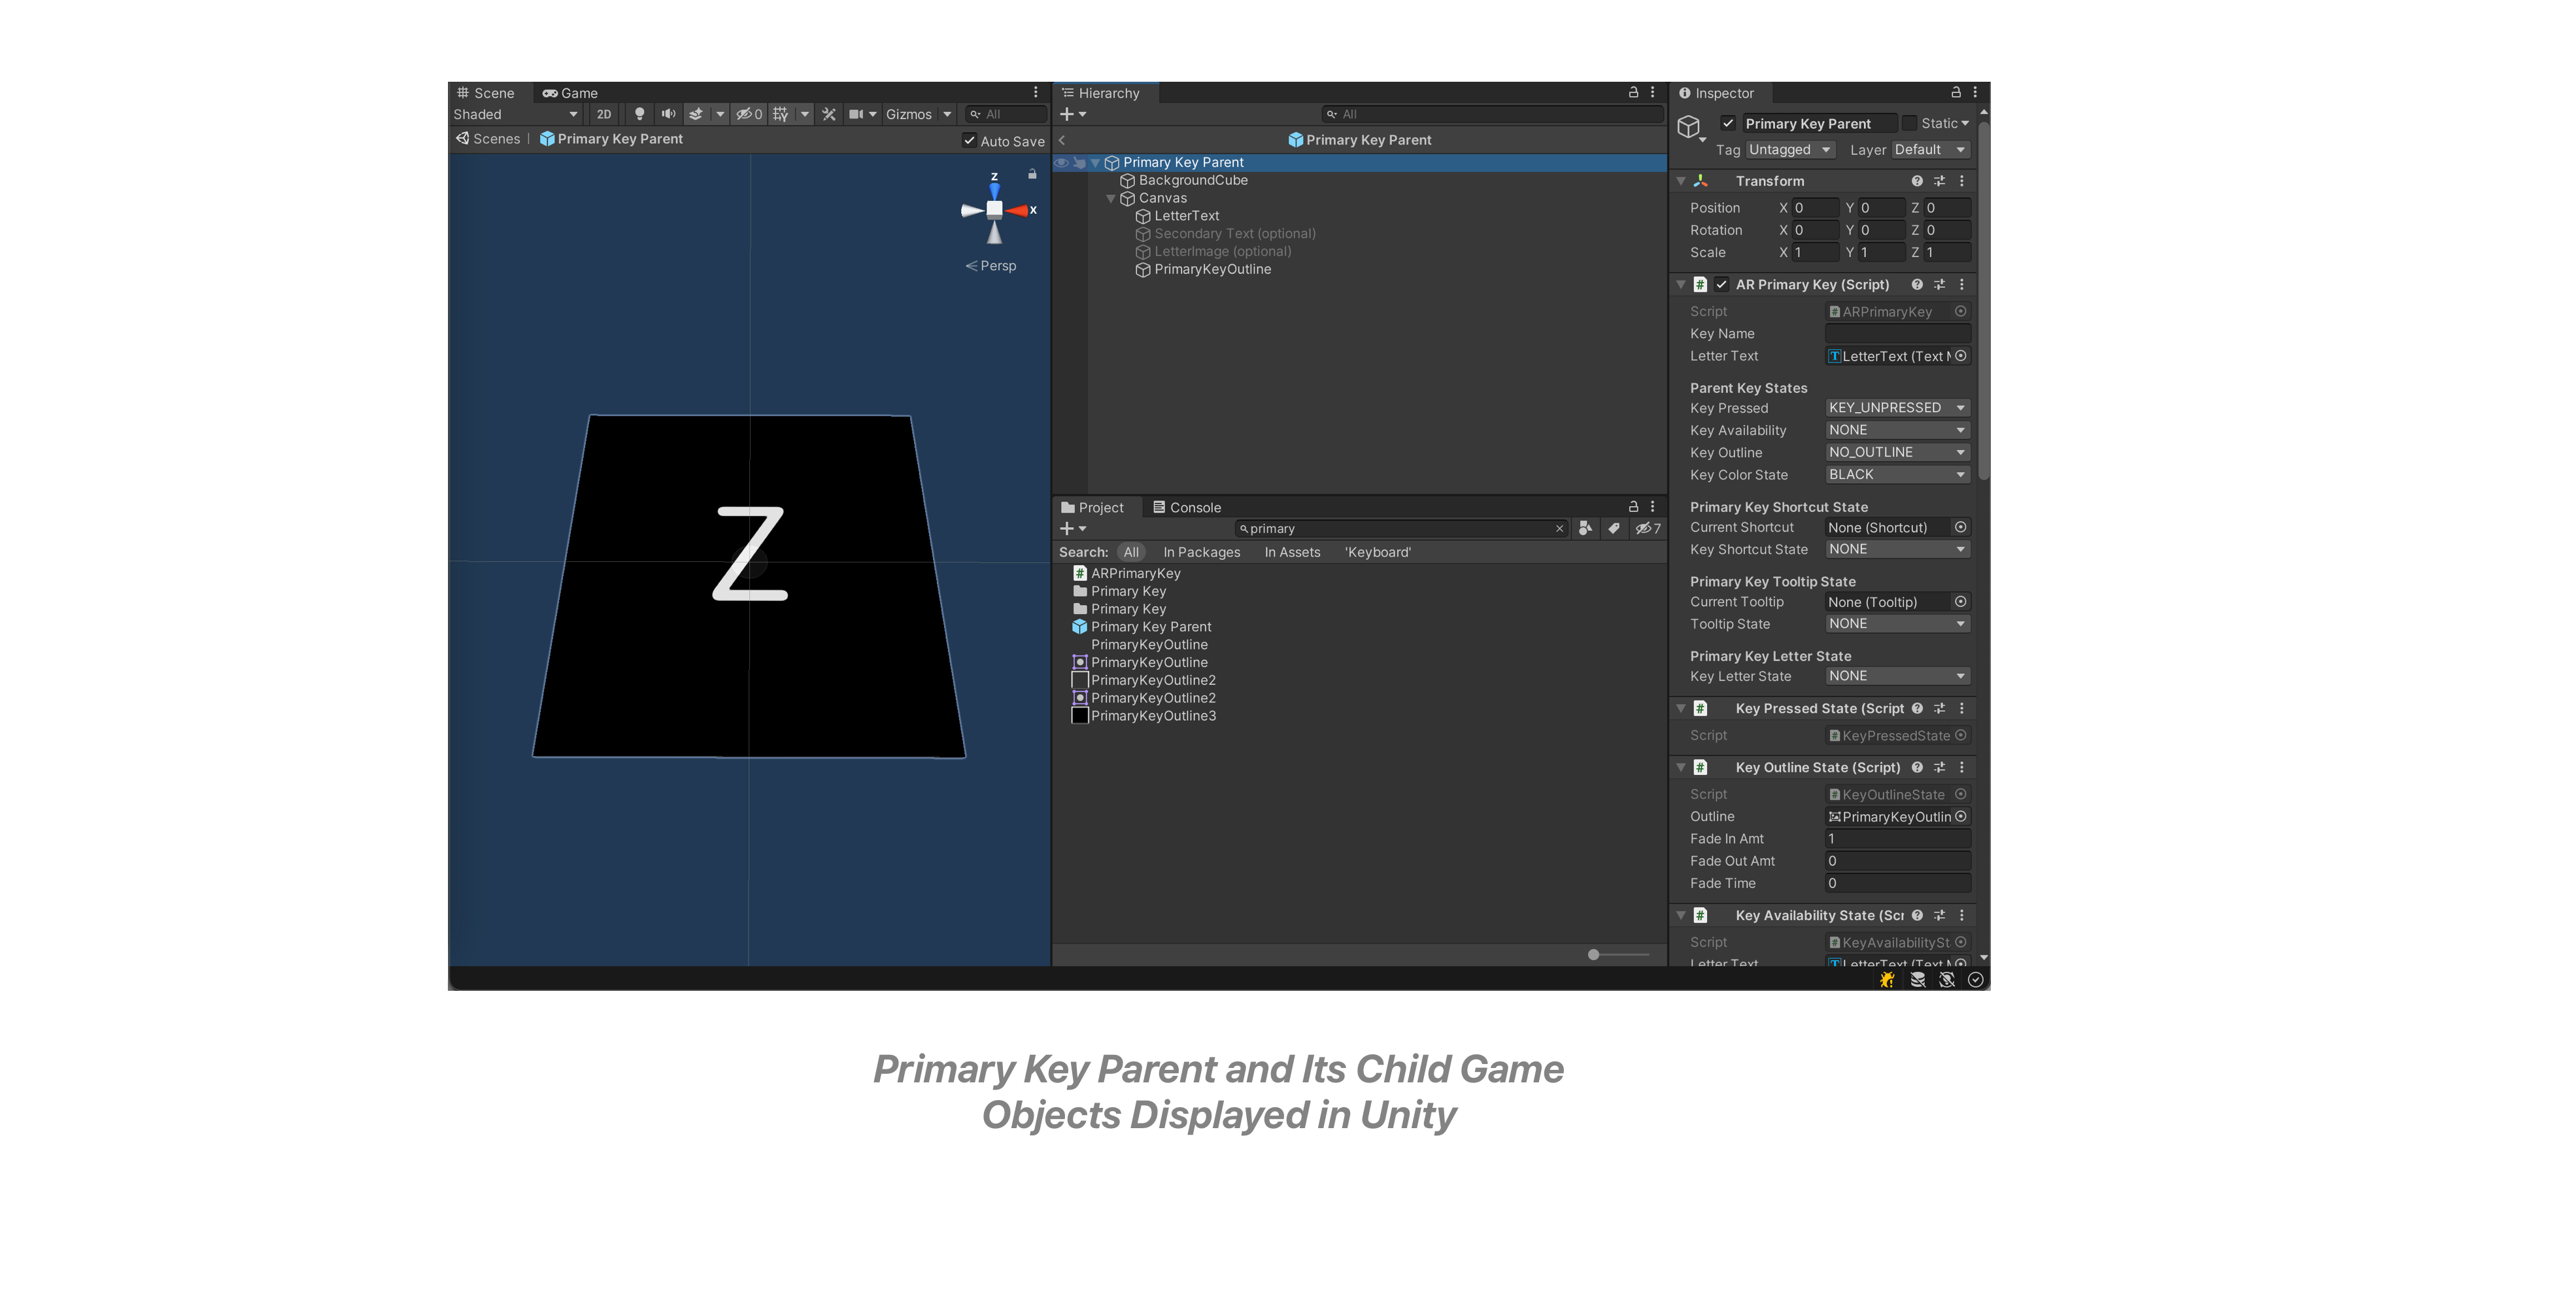
Then I created variants of the prefabs and split up the primary key to include, letters, punctuation, numbers and action keys, and set up simple scripts to place the correct keys in their position at runtime.
Initial Shortcuts
Then I set up the first iteration of shortcuts. I focused only a small set, not to mention only a small set were available on text editor app, in order to understand how to approach the design. I leveraged the DoTween animation library to animate the text - and began exploring several approaches for displaying shortcuts on the key.
Here, I explored using 3D graphics, and various animations on the keys, to help contextualize what a specific shortcut accomplished. (would like to further explore in the future) I also started considering different phases of the animation, and how a shortcut would behave before it was pressed, during press and after the press. So the user could understand what the shortcut could accomplish before executing it on the desktop app.
Moving On…
After the initial set of shortcuts was set up - I felt confident in my initial architecture and direction, and was ready to start exploring new features.
However I started noticing some lag between the keypresses and response in the AR App, so I checked the profiler to see what was going on. It turned out that my scripts were slowing down the app to 15 FPS whenever a key was being typed. I found the root cause of the issue, to be every time I pressed a key, the entire Normcore dictionary, and all values were being sent to HandleInput, then looping through all the keys, 40 more times than required. I was able to solve this issue fairly simply by checking, which key in the Normcore dictionary had changed, and only sending that specific key to handle input. There are still some additional performance issues in the passing of the normcore dictionary, that I would like to address in the future.
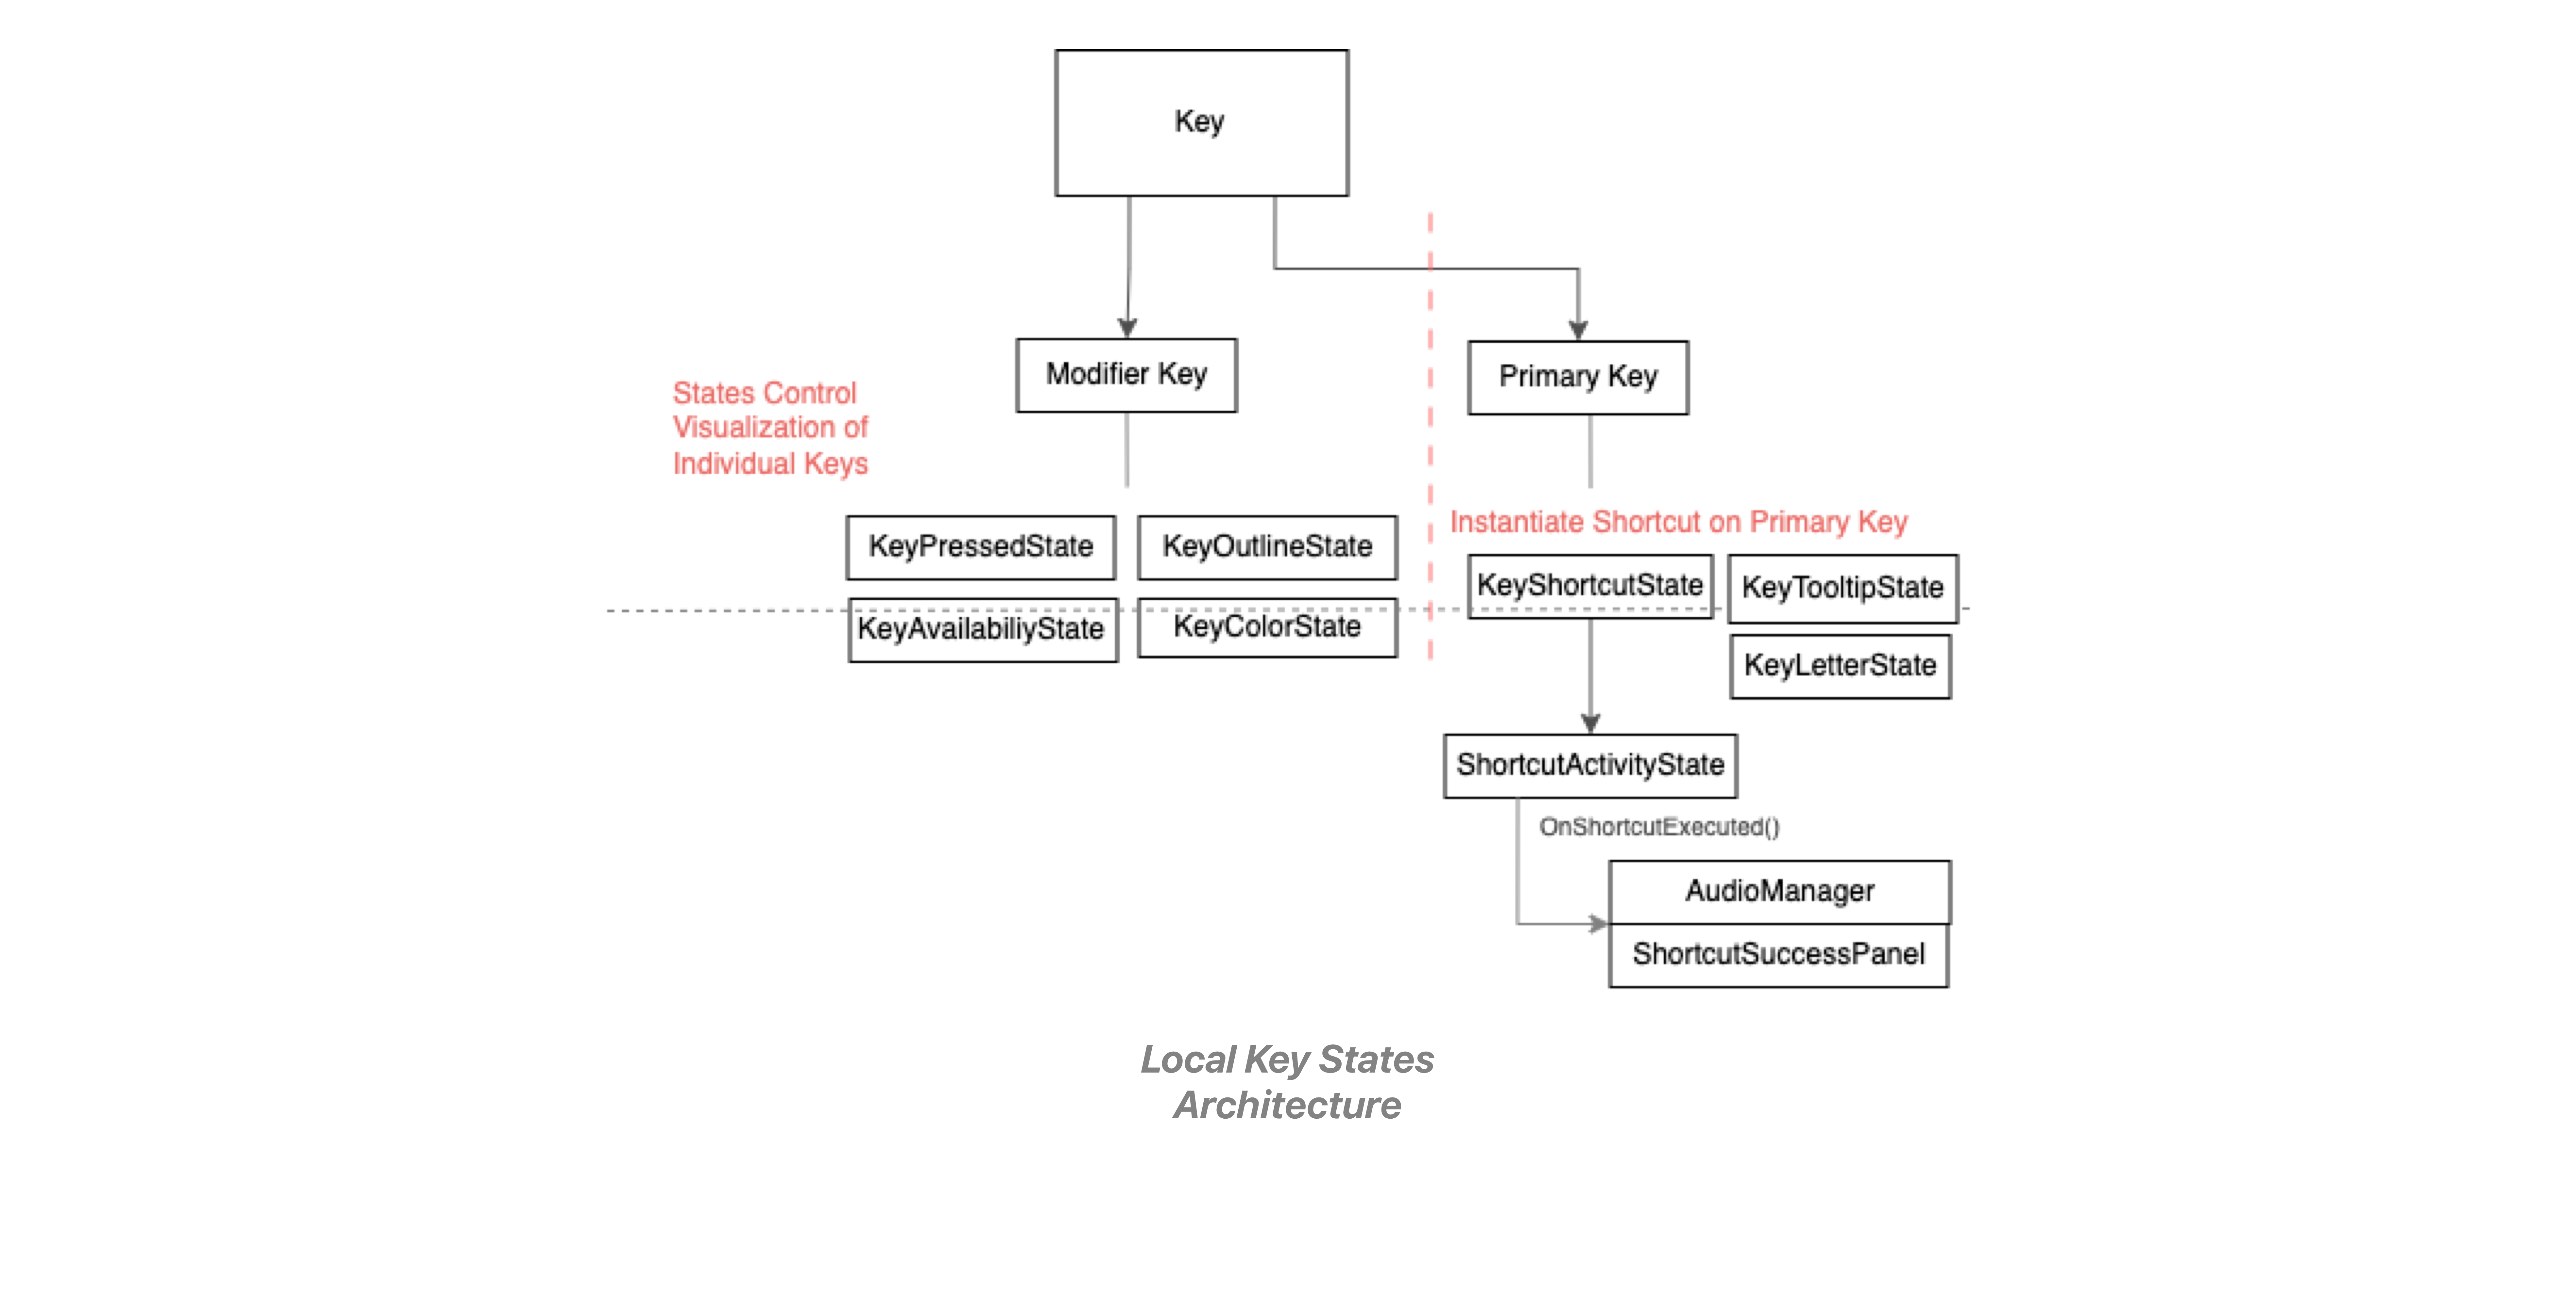
Once this was complete, and the initial round of shortcuts was set up, I started to approach implementing new features, but quickly realized that my architecture was not flexible enough to accommodate the changes. So started here, but progressing over time, I began restructuring the Ambient Mode State machine to communicate directly with the keys.
And in order to facilitate quick testing of the key visuals, I added local state machines to each key in order to control the various visuals of the key. So on each key I added a key pressed state, key outline state, key availability state, and key color state, and specific to the primary key, a key shortcut and tooltip state, for controlling different actionable items on the key. All of this was able to be controlled easily in the inspector.
With this new setup, I was now able to communicate directly with the keys from the ambient mode state machine, enabling more flexibility and room for exploration.
This opened up a new terrority for me that I haven’t explored before, being able to explore the design through code, and it was a fascinating and efficient experience that I aim to use much more in the future.
Welcome Mode
 Design of Welcome Mode Progression
 Now that initial mode was ‘complete’, I felt I needed to have an introduction, once the keyboard was placed. To both, showcase to the user that the keyboard was accepting input, and also to have a smooth transition into the experience. So I went into Sketch quickly concepted out a few screens to reflect the initial ideas I had regarding this ‘mode’.
Once that was complete, I created a secondary state machine from the AR Keyboard that launched from app start, and used DoTween and the new key architecture to easily control the KeyPressedState, to highlight all the keys and when the animation ended, I executed a callback, transitioning back to the main experience.
Initially, I recontextualized the spacebar to serve as a start button into the experience, but I removed it in order to simplify and speed up users access into the main mode.
Learning Mode
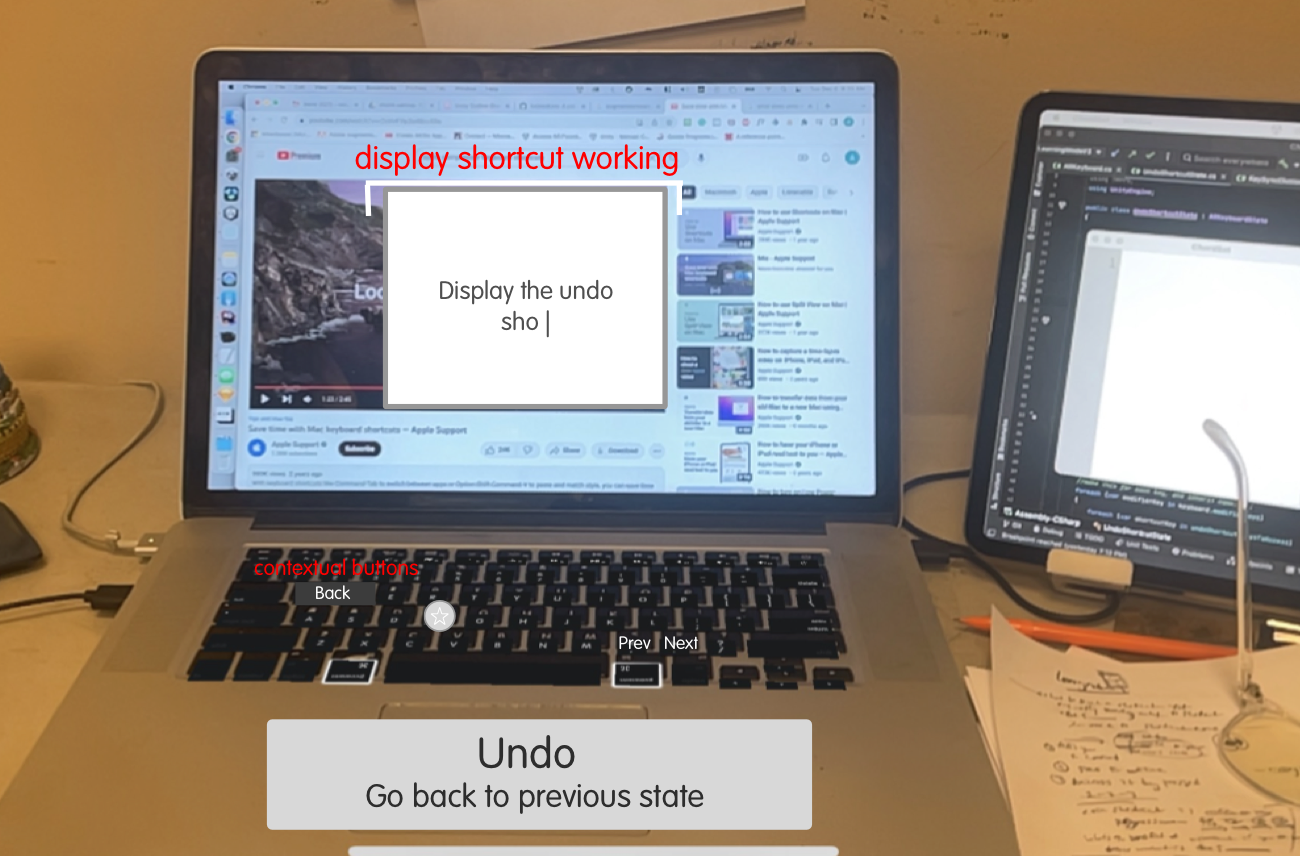 Learning Mode Designs
So I now had the welcome mode set up, indicating a pretty solid initial experience.
And the shortcut were able to be viewed contextually as logos on the keys, however I was not happy that one could not view / or learn individual shortcuts. (Which was the primary reason I built the app to begin with). So I deiced to explore ways to display individual shortcuts to a user, (without a list) , and I came up with Learning Mode, for users to learn new shortcuts by getting the opportunity to preview them and visualize the keypresses on the keyboard.
Again I went back to my new interesting process. I quickly began sketching out the concept in Sketck, enabling me to come up with interesting conceptual designs, that I knew could soon be tested, and then began iterated on the designs through the project.
And I developed some fascinated results.
First off, I started tracking the user’s computer screen, expanding the experience off of the keyboard and into other areas of the environment (would like to explore further.) With the computer screen tracking, I was able to locate the position of the users text editor app, and overlay a video of the command in action - enabling me to demonstrate what a particular command is able to accomplish. At the same time as the video overlay, I had the keyboard light up to show what keys were being pressed in order to activate a similar command. Still in learning mode, the user was then able to try out the shortcut on the keys themselves, by following the key outlines.
Next I explored, recontextualizing the keys on the keyboard, to have functionality based on the keyboard mode that the user was on. Here I added buttons, including the favorite icon, which I intentionally placed in an explore area, to make it not relevant to the key itself at all. (I would like to further explore this in the future where the keyboard could contextually control the experience of the app, eliminating a lot of the hurdles with the keyboard itself, but would require direct control with the app.) I also added left and right buttons on the arrow keys so that the user could sift through various shortcuts.
Overall although this was a very interesting approach, in the end I felt uneasy that Learning Mode, was displaying the same shortcuts as ambient mode, but the shortcut instances themselves were in no way correlated. In addition it would take a long time for a user to access a specific command, by going through each shortcut animation one by one.
3 State Machines on the AR Keyboard
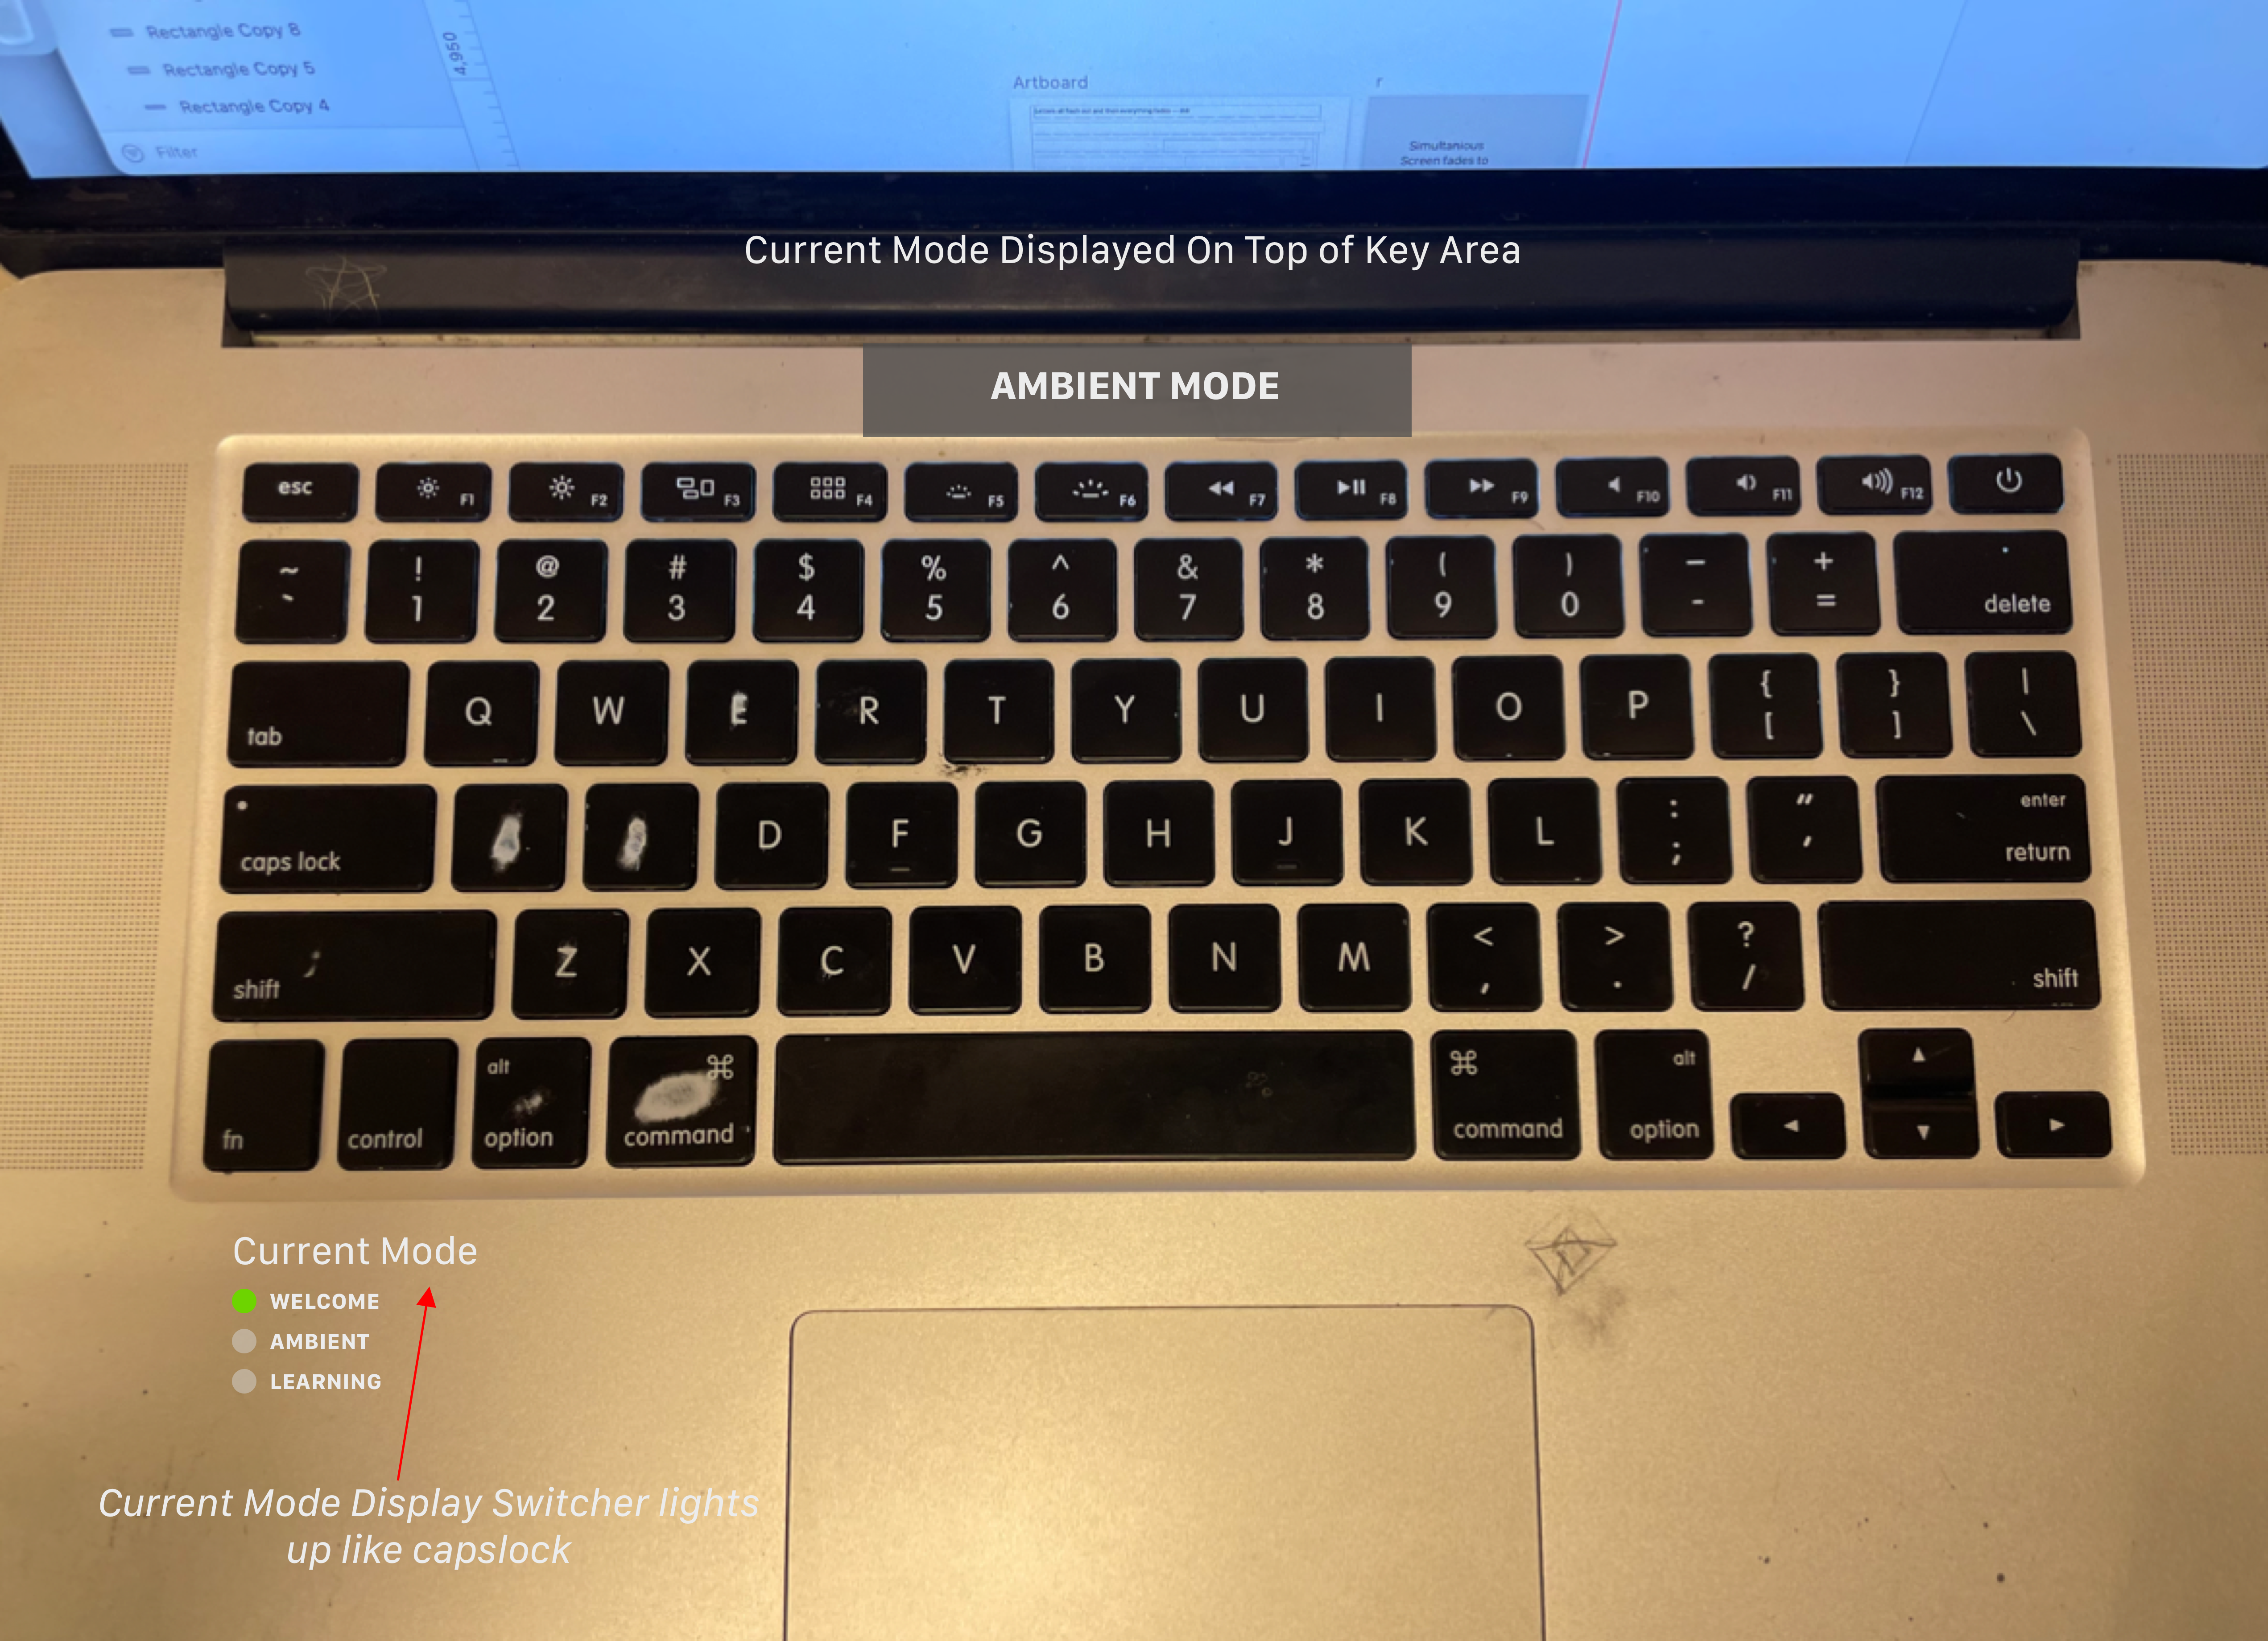
At this point I had three different modes independently accepting input from the AR Keyboard, so I created a state machine within AR Keyboard to handle control to the various states.
Thinking a user would also want to be aware of the current state they were in, I concepted a design, where they can visualize current state, on the palm rests, and the area above the keyboard. Although I didn’t move forward with this design, I am still interested in exploring ways to implement other areas of the keyboard, including the screen, palm rests, trackpad, to help with users being able to learn keyboard shortcuts.
Learning Mode Phase II
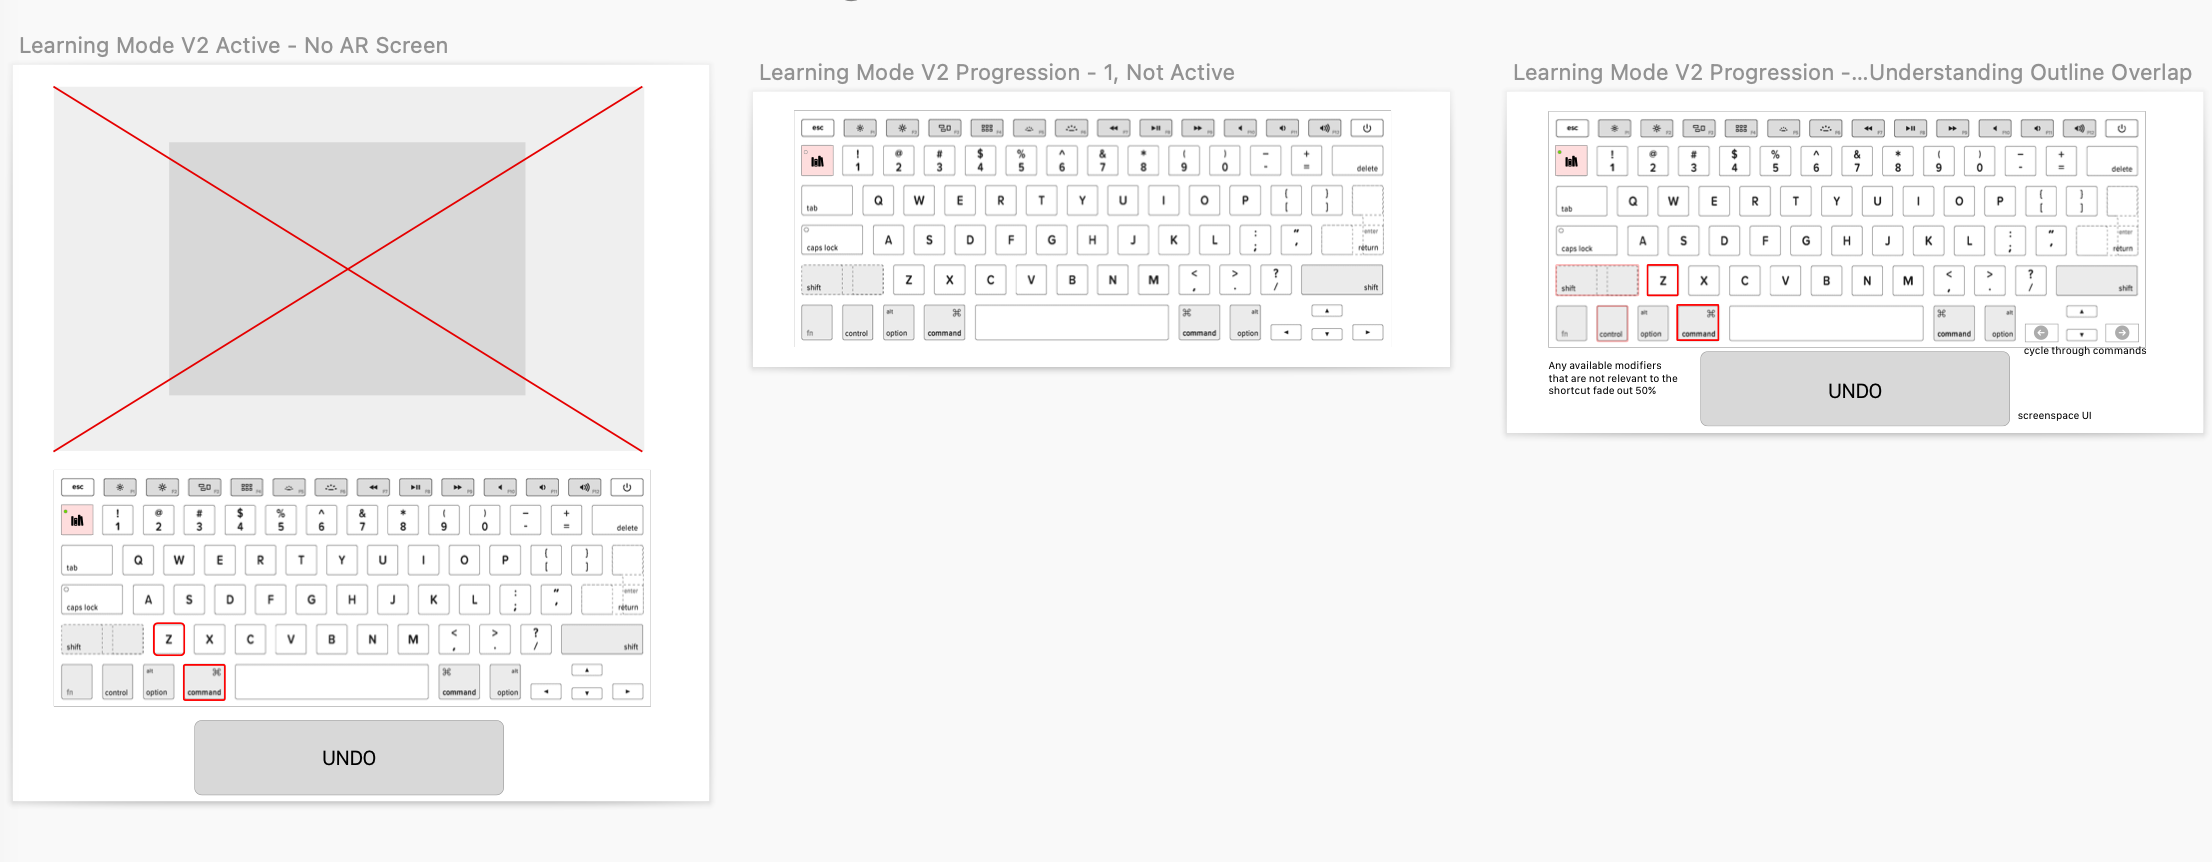 Learning Mode Second Phase Designs
Still unhappy with learning mode, I realized that structurally there was an issue. Learning Mode shouldn’t be a separate mode, but rather it should be integrated directly into ambient mode, so users can learn commands, while staying in the flow of typing. So I went back to Sketch and drew up new concepts. And I created a concurrent state machine, that ran during ambient mode and displayed the current shortcut.
In order to make this mode work, I leveraged the caps-lock design, and placed a dot on the learning mode key to show that it is active, and when it was the current shortcut, would visualize on the key, after the visualization was complete, an outline would persist enabling a user to revisit the command, or they could sift through the various commands using arrow keys on the keyboard.
Again, this was an interesting approach, and allowed the user to use the keyboard while also seeing commands. However, I noticed another structural issue, this mode was visualizing shortcut in ambient mode, and leaving an outline persisting through multiple states, ambient mode was focused on single state, this confused the user. This I knew I had to continue progressing the design
Back to the list
I finally decided to implement the list, since the begging it kept repeatedly coming back to m mind as a good solution, but I continuously nixed it because of a user having to leave the keyboard to access the list through the phone. But nevertheless I thought I would give it a shot.

So I created a list, populated it with all the shortcuts and made the list accessible through a button on the GUI, when a user clicked on the shortcut, I activated the newly implemented shortcut preview manager to light up the keys of the shortcut in succession. I knew this was the right solution.
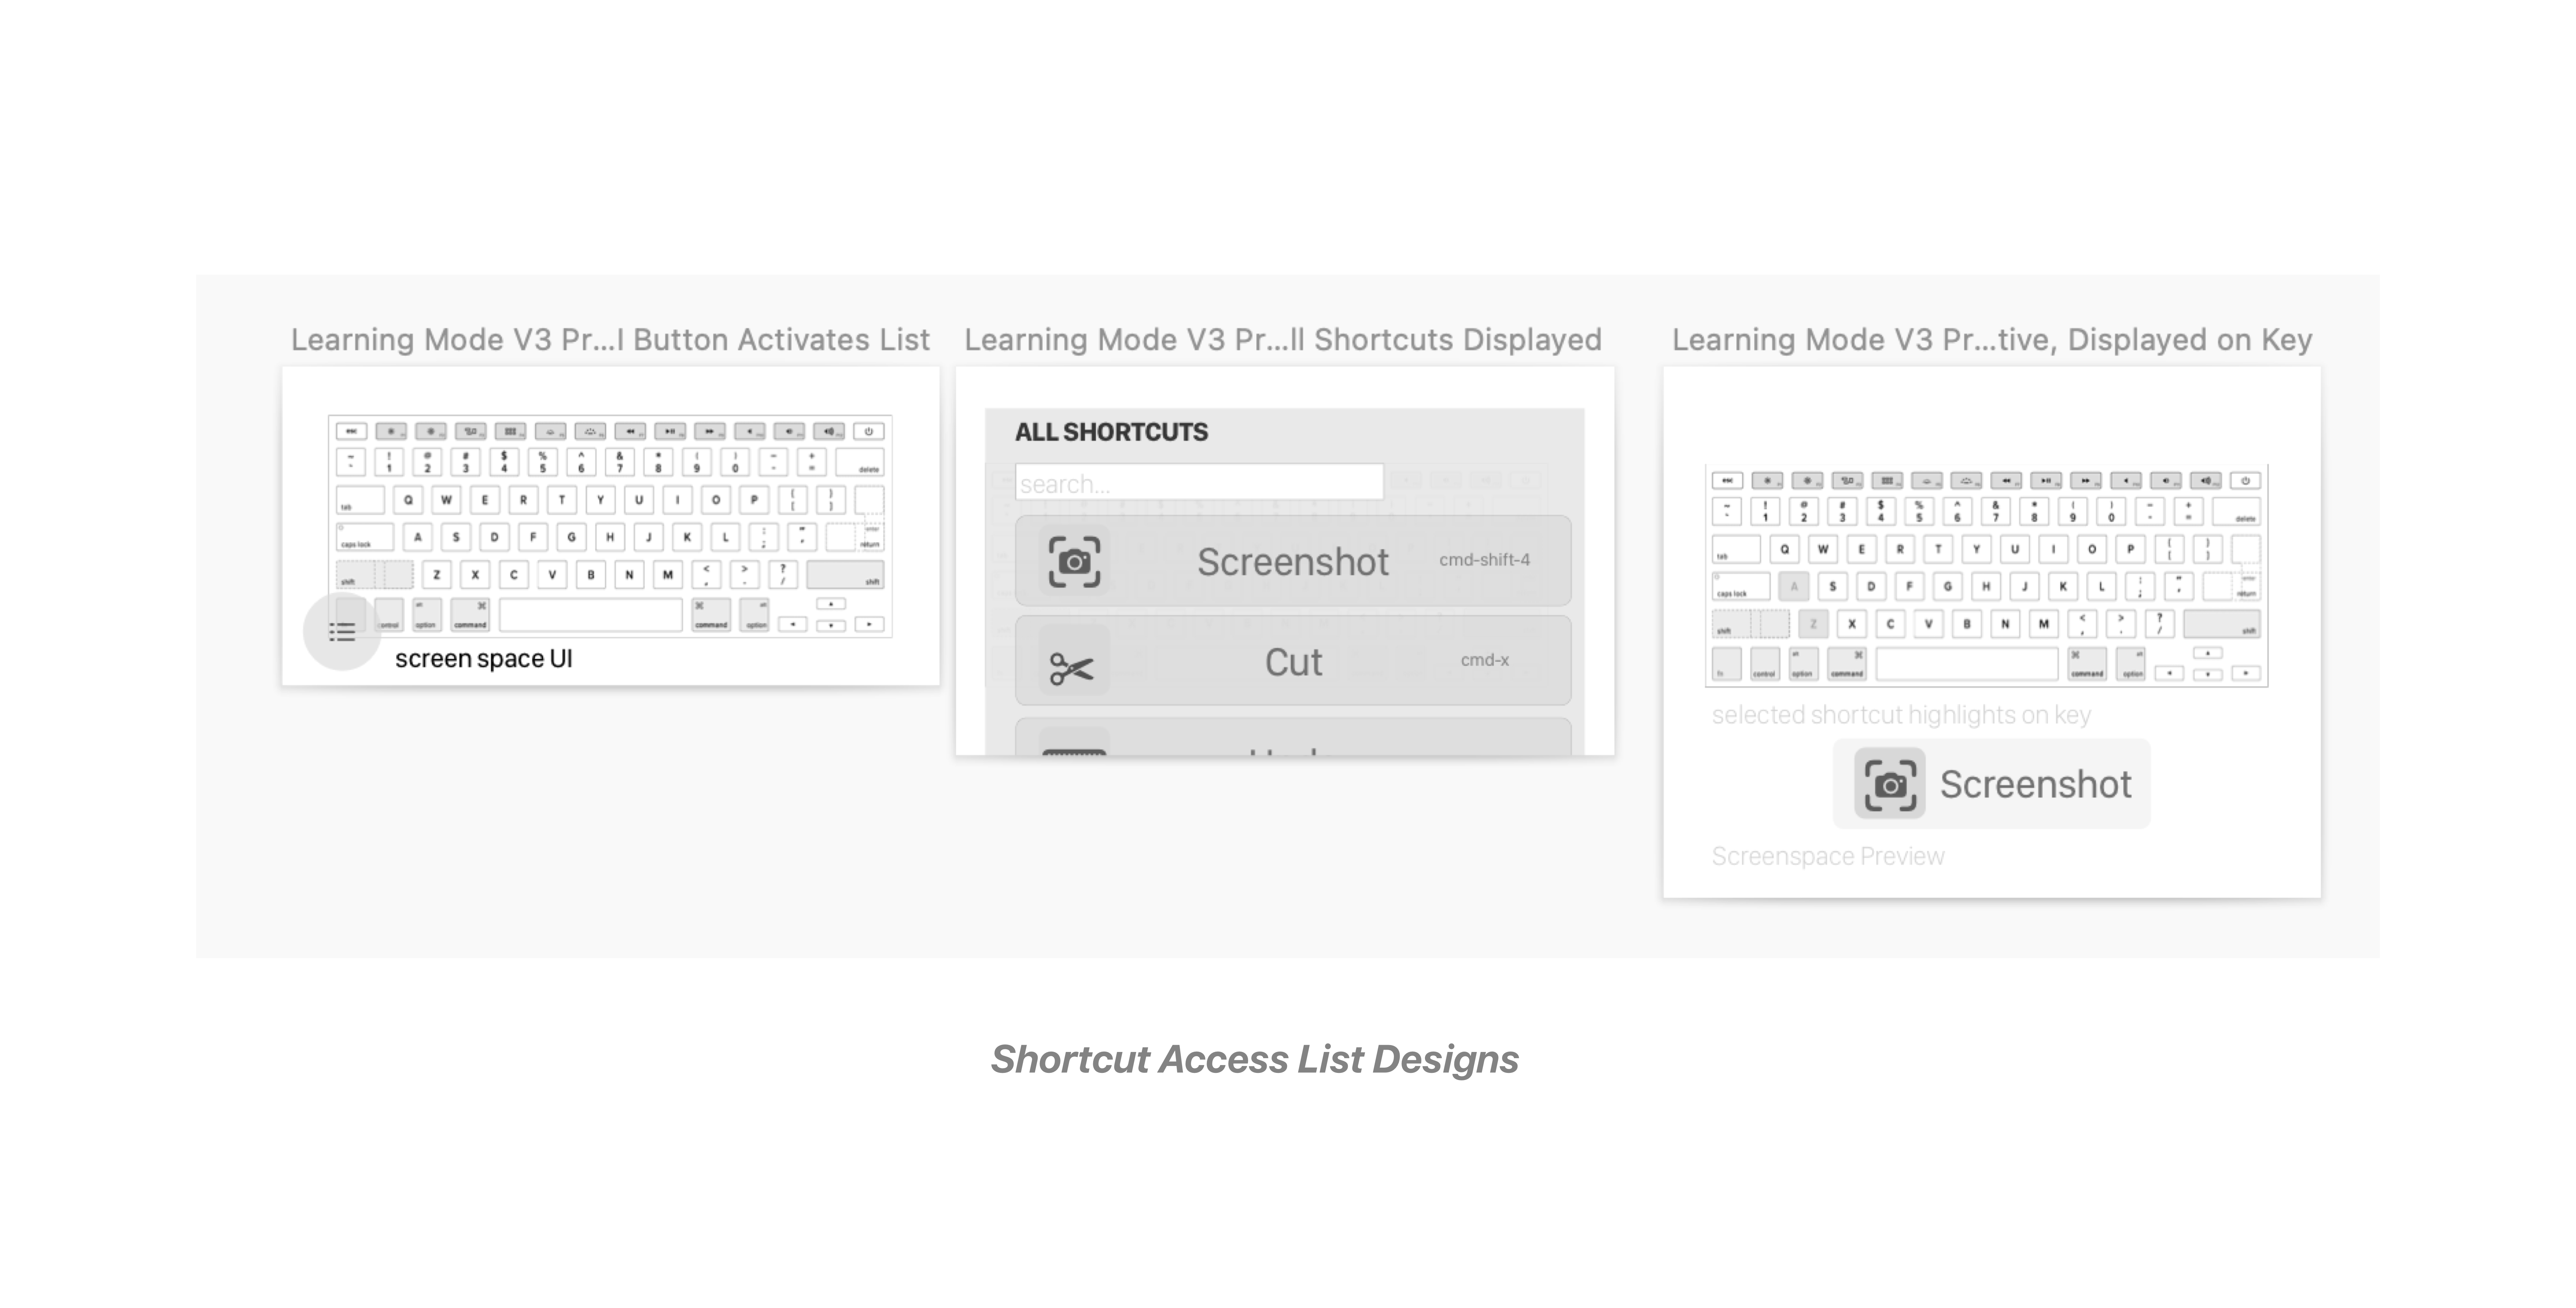
In order to display the shortcut on the Shortcut Preview manager, I created a KeysToAccess array on each of the shortcuts, and when a shortcut was instantiated on a list, and clicked, I lit up each of the required keys. Since the shortcuts had to be instantiated here again , and they weren’t related to the instantiated shortcuts on the keys, I noticed an issue. And through this realized an entirely new architecture pattern that I was striving for the entire time. All of the shortcuts should be instantiated on their required key - and the entire app would be based around shortcuts, and what keys needed to be accessed, and which were currently pressed. I believe this could drastically simplify the app and introduce some automation to the state machine, not required everything to be manually set up. I would like to explore implementing this architecture in the future.
Trial and Error while setting up the list.
But the list was great and I was happy about its implementation, and as I was finishing up the list interaction through the phone, I realized that I could just trigger the list through the Learning Mode key in the keyboard. And even more so, scroll, search and interact through the list, all from keyboard input. This would enable the user to access commands quickly, without having to leave the keyboard, keeping them in flow of the application. So I set up a full list functionality, through keyboard input, and thus I felt confident in my current iteration of the product, and I believe in its usefulness for both experts and regular users.
In the end …

And with that I am happy to share the latest architecture for the entire app, that I put together over time, with a lot of back and fourth between the design and code. Hopefully the above documentation, gave you an understanding on all the various components that when in to designing the overall app. There are many areas that can still be improved, however it’s important I move forwad and continue the momentum, to focus on other works.
Looking Back
Through this process I had the opportunity to take a step back and asses some areas of my work that could be improved.
Most importantly, I noticed that I have hesitance when working through the app’s architecture, and spend too much time going back and fourth without making decisions. This is due to insecurity and lack of experience, I believe that through more iteration on the code through some sort of sandbox, would enable me to validate coding concepts, so I can more easily solidify directions. In addition, approaching designs through a more iterative process and with the code, will enable me to fully appreciate what is possible without nixing ideas too early, and being able to fully flesh out ideas. Because of both these reasons, it was difficult for me to define clear architectural decisions, before creating the app, enabling a back and fourth, which ended up teaching me lessons, but looking back at it, was time consuming at took away from true iterations in the process.
Moving Forward
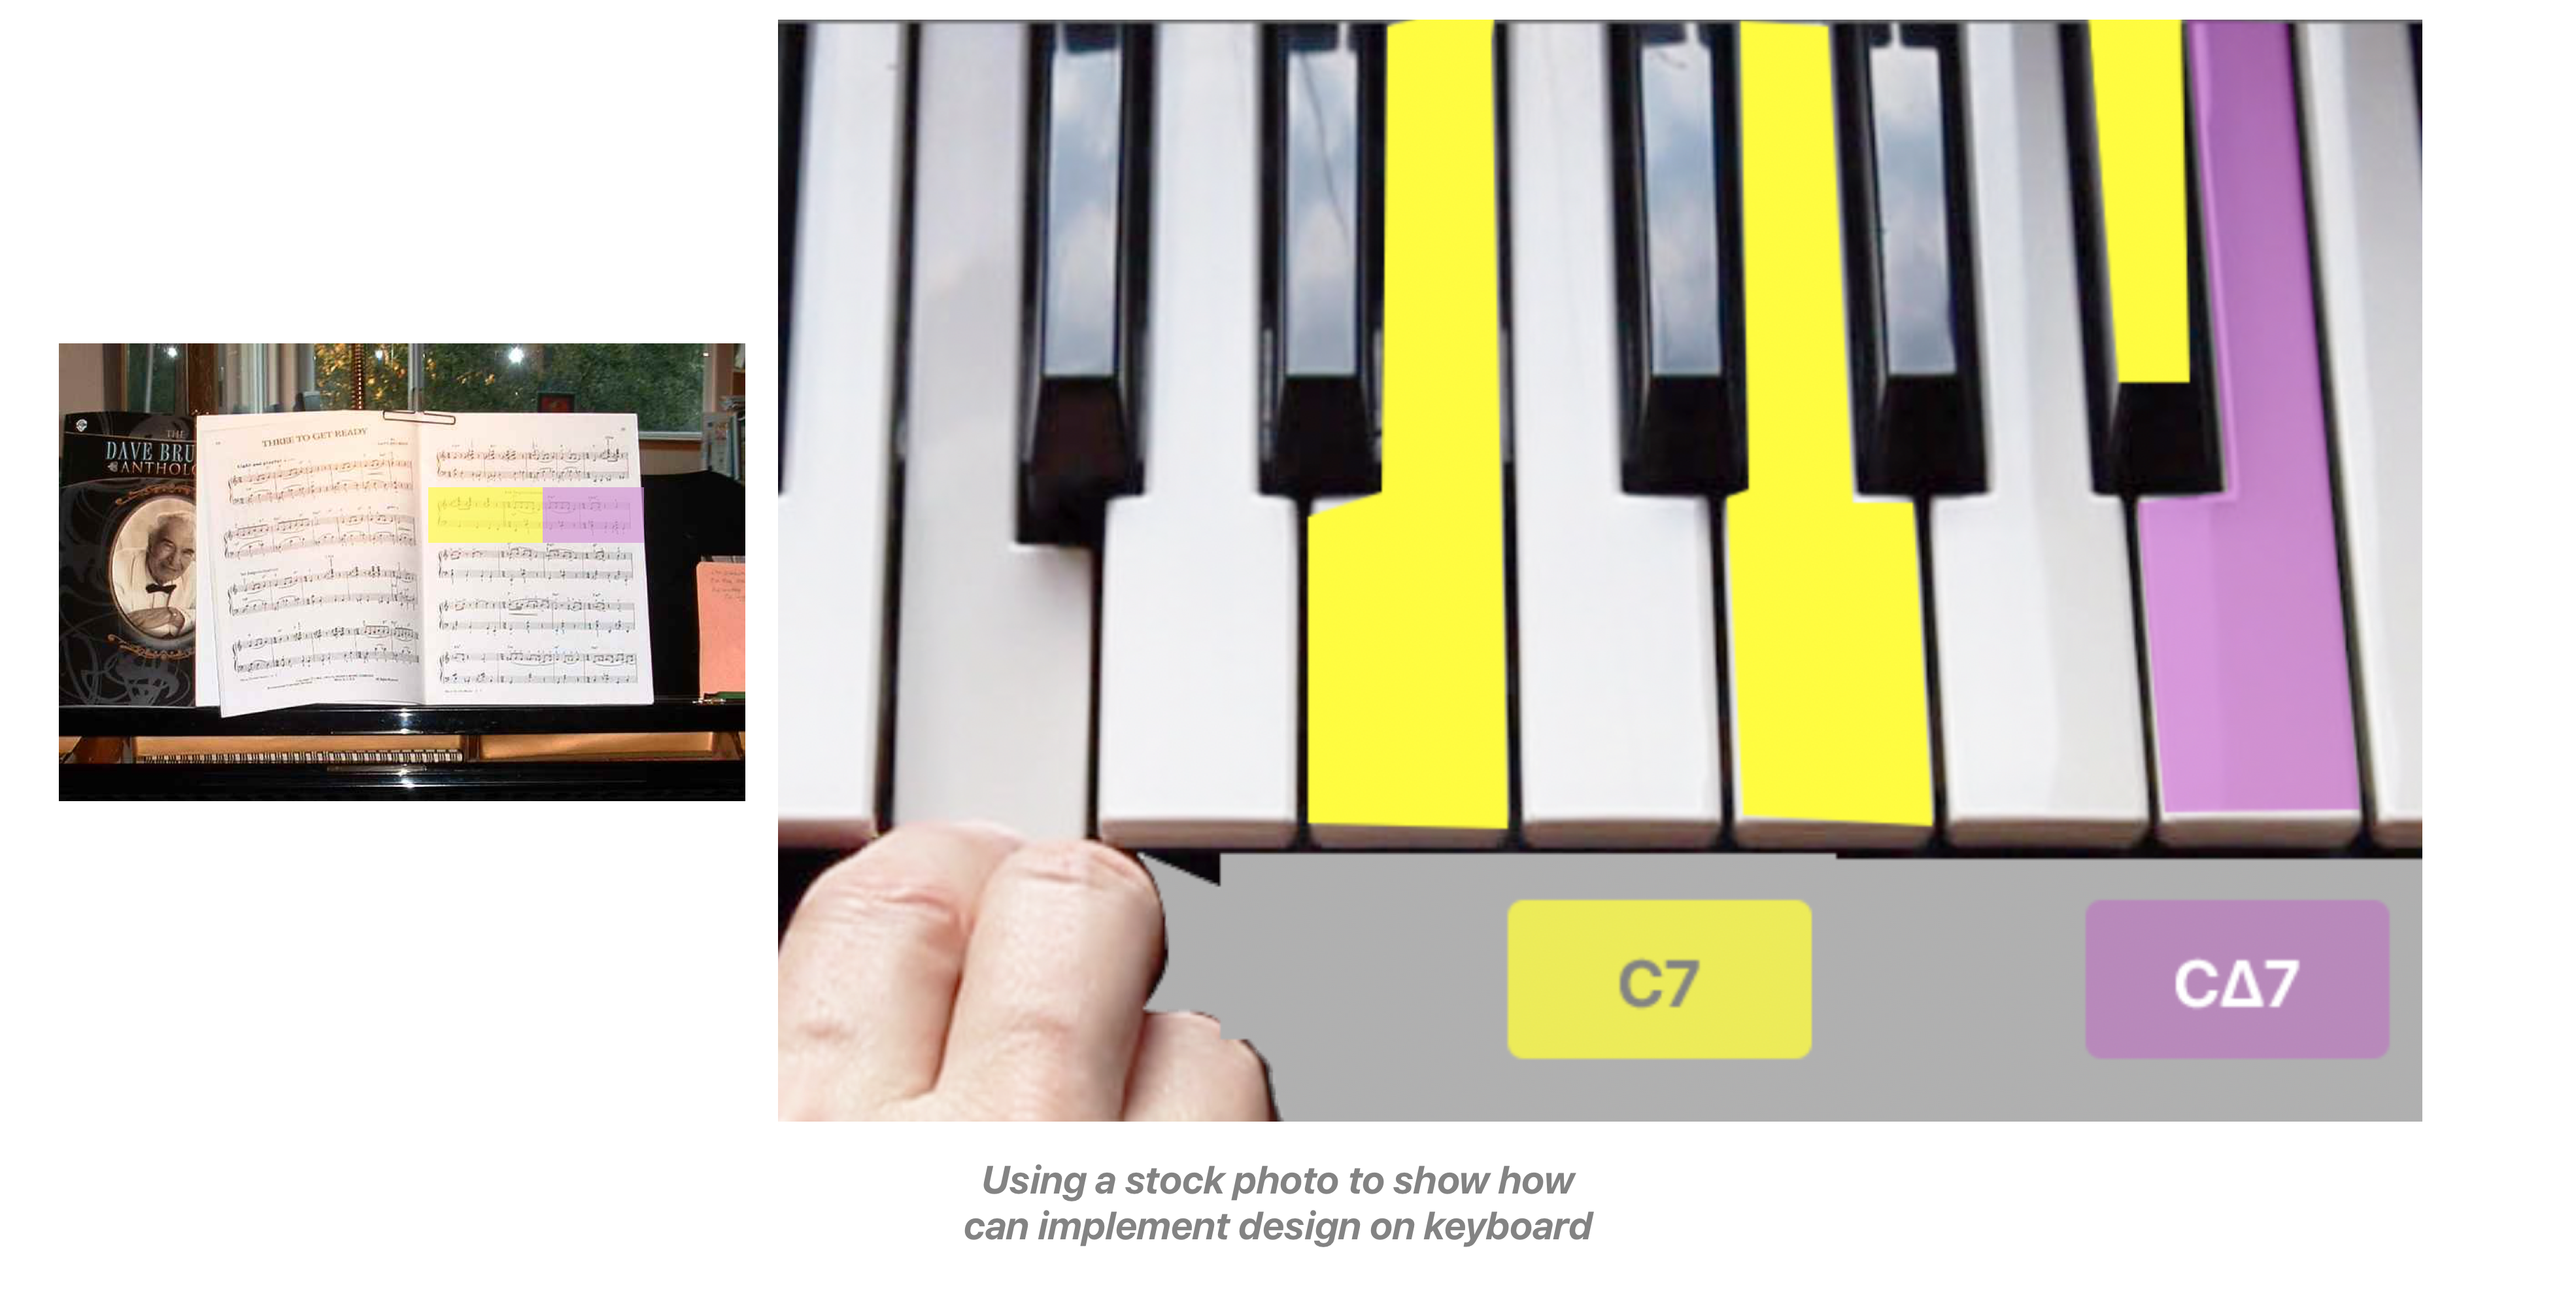
Moving forward I am very interested in exploring further implementing different objects in the environment in order to teach keyboard shortcuts, such as the trackpad, key rest, or screen (which although explored, would like to take a deeper look). Additional game engine elements, 3D objects, particle effects, videos on keys, sounds etc, to help teach users keyboard shortcuts. And lastly getting the opportunity to apply the design methodology to other tools, such as helping users play musical chords on a MIDI Keyboard.
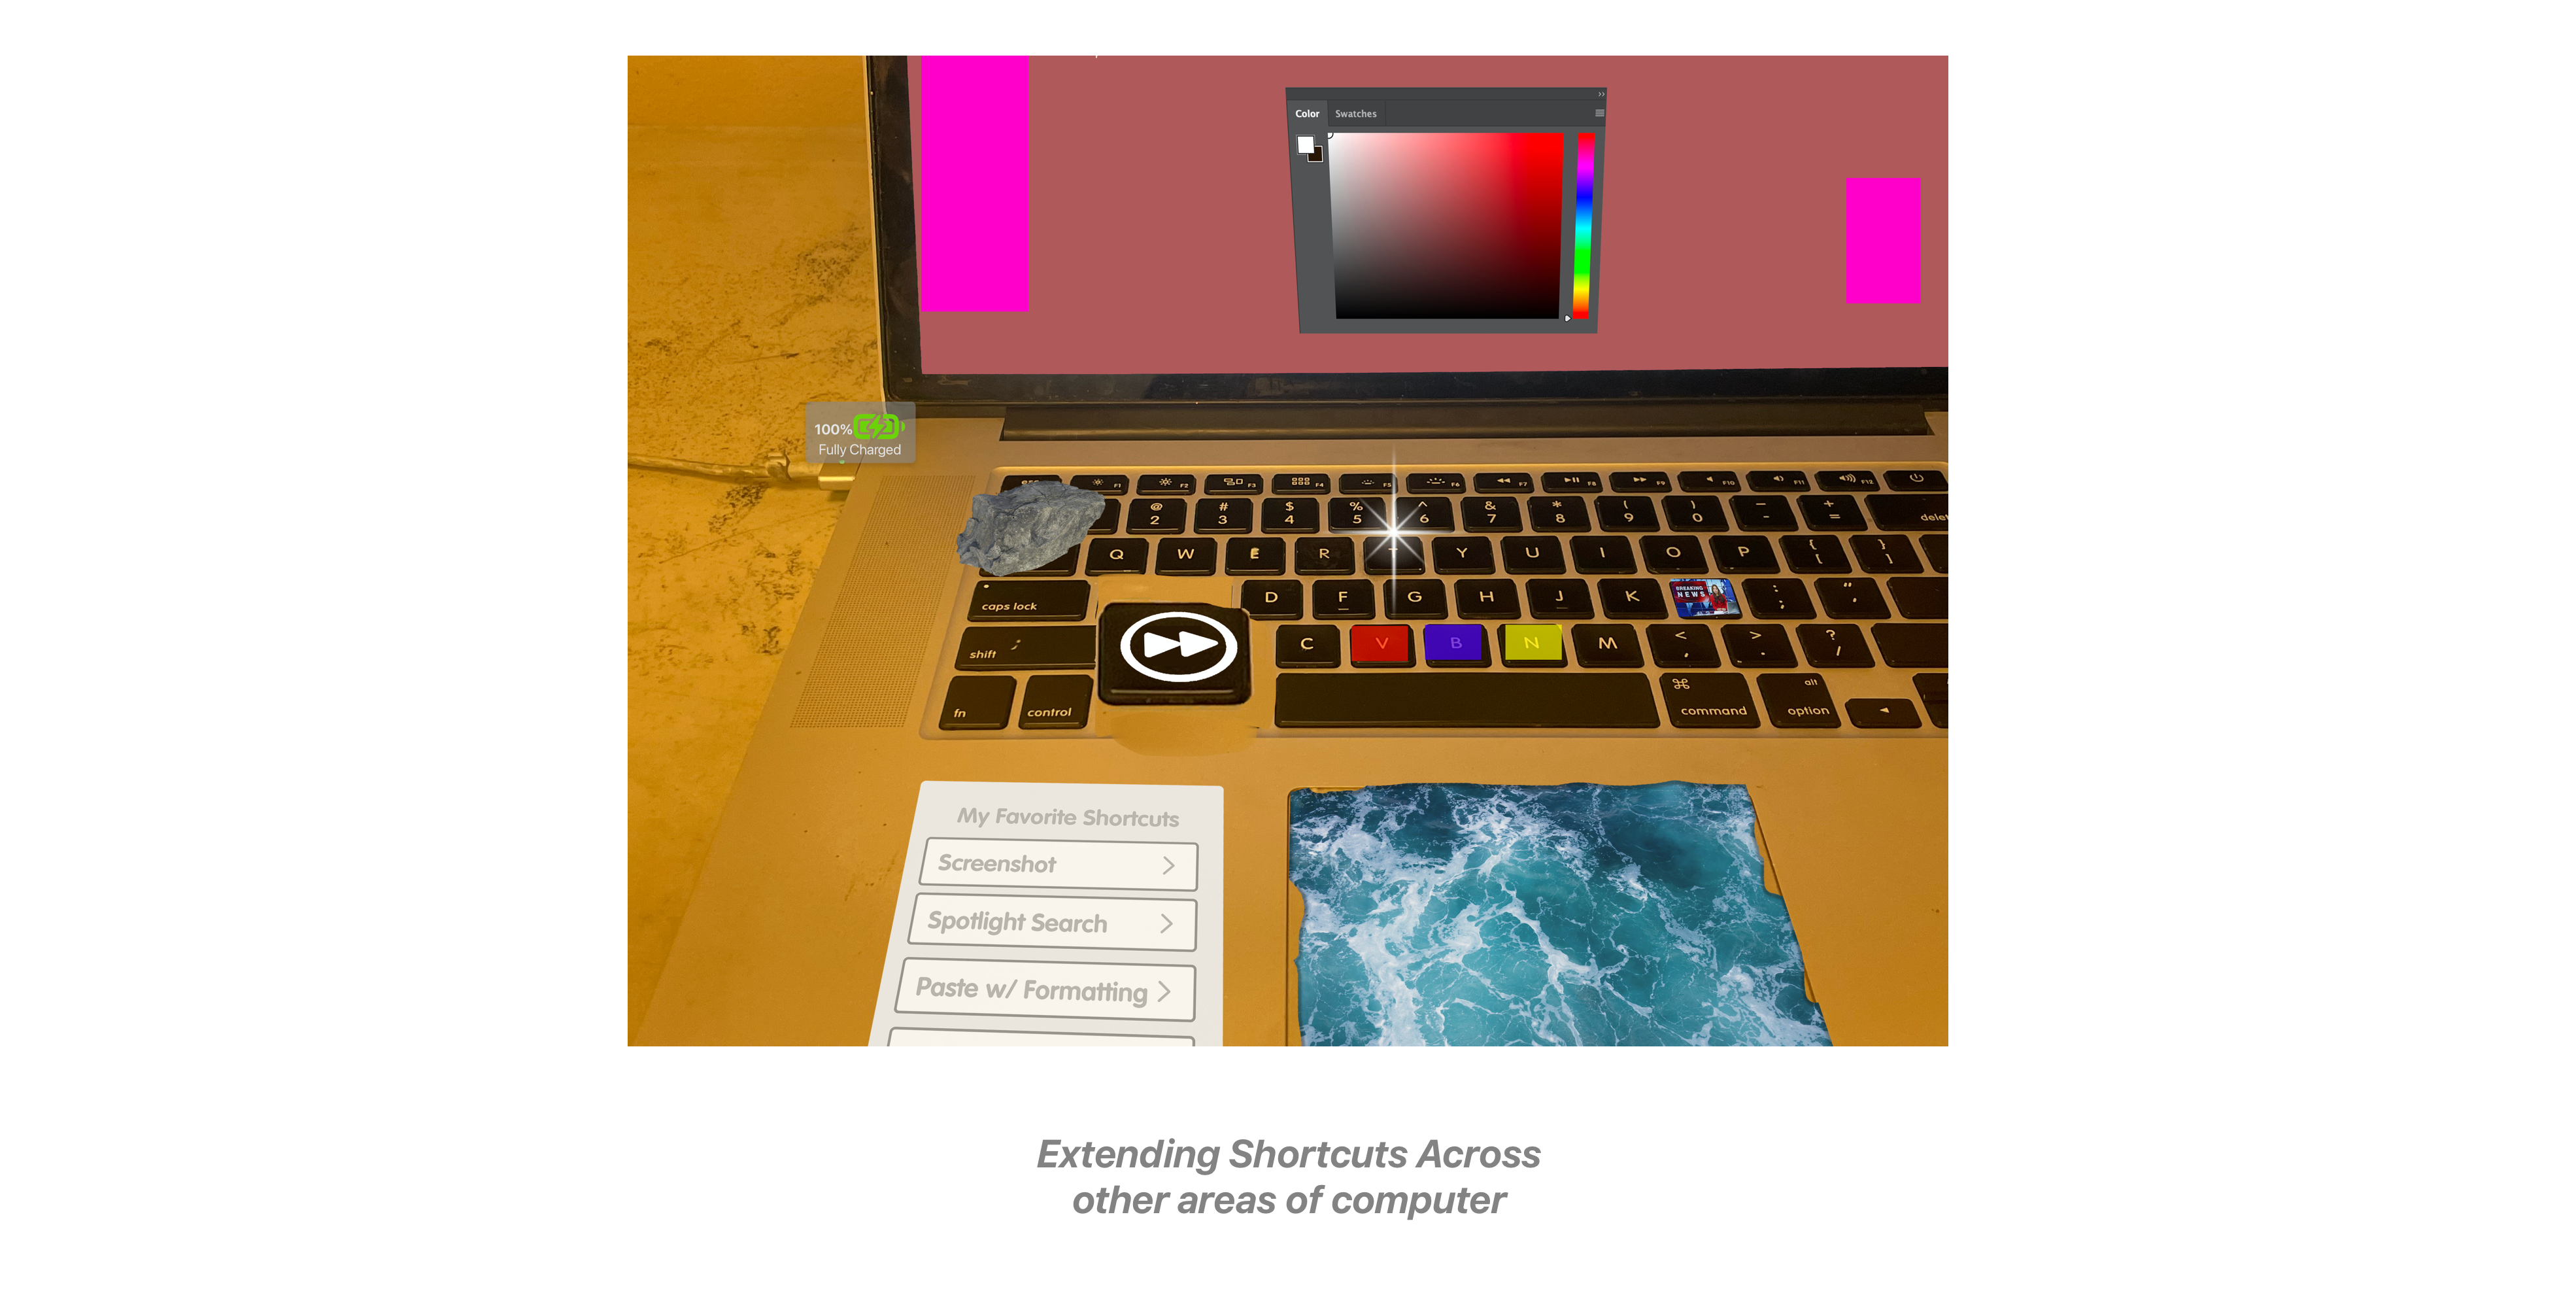
There are still a lot of concepts that I haven’t explored, and I did my best to give a comprehensive overview on the entire design and coding process, but inividetly missed some parts, due to oversight, lack of documentation and organization, research of the coding process, but I hope through reading this you can get an idea of how I approached a project that was very important to me, and I believe can help improve the way we interact with computers. I look forward to getting the opportunity to share the work with others, to continue exploring the possibilities in the future.
Thank you for reading,
Andy
